CALL US TODAY

Ā Ā 

CALL US TODAY

person changing the year from 2023 to 2024 using wooden number blocks

7 Manufacturing Industry Trends To Expect in 2024


As we look toward 2024, the manufacturing industry is poised to undergo significant transformations that could redefine its landscape. Technological advancements, combined with shifts in consumer behavior and expectations, are paving the way for more efficient, sustainable, and customer-focused manufacturing than ever before.

These manufacturing trends encompass various areas such as automation, digitalization, sustainability, labor shortages, and workforce retention with each having far-reaching implications on how manufacturers operate and plan for the future. These trends could mean significant change is needed in your manufacturing processes. Learn more as we look at seven key trends the manufacturing sector will likely encounter in the coming year.

1. Artificial Intelligence Will Take Center Stage

Artificial Intelligence (AI) in manufacturing continues to accelerate the Fourth Industrial Revolution or Industry 4.0. AI algorithms optimize and streamline manufacturing operations to boost productivity, improve quality control, and reduce operational costs. Machine learning, a subset of AI, enables predictive maintenance by recognizing potential equipment failures before it can cause significant downtime. AI-powered robotics enhances precision and efficiency, and using AI in supply chain forecasting reduces waste and improves delivery times.

AI offers numerous benefits, including its ability to analyze huge chunks of data quickly and in real-time. With the use of Industrial Internet of Things (IoT) devices and sensors, data collected from machines, equipment, and production lines can be processed and analyzed by AI algorithms, enabling manufacturers to understand their production processes more effectively.

Another advantage of AI technology in manufacturing is its ability to identify irregularities and equipment defects. With machine-learning algorithms trained to recognize patterns in the data, manufacturers can make informed decisions and detect quality issues early on in the production process.

Overall, AI can assist manufacturers in implementing the aforementioned predictive maintenance systems, optimizing supply chain management, proactively identifying and addressing workplace safety hazards, and enhancing decision-making. This digital transformation continues to reshape the manufacturing landscape, driving innovation and competitiveness.

2. Robotics and Automation Help Manufacturers Stay Competitive

Intelligent manufacturing includes robotic process automation where robots take on repetitive and dangerous jobs like assembly, welding, and material handling, freeing human resources to focus on more complex and creative tasks. Robotic technology accomplishes these repetitive tasks faster, more accurately, and without the fatigue inherent in human labor. Manufacturers can combine robots with IoT sensors and big data analytics to create a more adaptable and responsive production environment.

Ultimately, the advanced technologies in robotic automation drive smart manufacturing, improving efficiency, decreasing errors, cutting equipment downtime, and enhancing worker safety. Plus, robots can work nonstop, allowing manufacturers to operate 24/7 and significantly increase productivity.

Yet, the rise of robotics and automation also poses challenges, particularly concerning job displacement and the need to close the skills gap. As these technologies evolve, manufacturing companies must manage the transition sustainably and beneficially.

3. Additive Manufacturing Will Gain Market Share

3D printing (a.k.a. additive manufacturing) has revolutionized the manufacturing industry by enabling the creation of complex, custom, and scalable designs with high precision. It works by stacking multiple thin layers of material on top of each other using a digital model, resulting in a three-dimensional object. This advanced manufacturing technique reduces material waste and produces parts with intricate geometries that would otherwise be impossible to machine using traditional manufacturing techniques. Moreover, 3D printing can accelerate product development since companies can create and test prototypes rapidly, decreasing the time to market for new products.

Smart factories have used this cutting-edge technology for several years because it eliminates many of the limitations of part geometry while streamlining the manufacturing process, thus saving time and reducing costs. Industries like aerospace, automotive, and healthcare benefit from this innovation as it enables the production of intricate parts and the ability to create spare parts as needed, avoiding supply chain disruptions.

4. Supply Chain Disruptions Will Keep Reshoring on the Front Burner

Get ready for another significant change in manufacturing! Global issues like the war in Ukraine and the pandemic caused considerable disruptions in the supply chain that are likely to continue. However, manufacturers are finding a way to adapt and improve the situation with restoring.

Reshoring refers to bringing domestic manufacturing and services back to the United States from overseas. This business strategy emerged as a response to the challenges and costs associated with offshoring such as increased shipping expenses, communication difficulties, and quality control issues.

And reshoring isnā€™t just a tiny shift. A 2022 report from The Reshoring Initiative reveals a whopping 364,000 reshoring and foreign direct investment (FDI) jobs for 2022. That’s a 53% increase from the previous record set in 2021.

Why is reshoring so important? There are several reasons:

  • Reduced Costs: Although foreign manufacturers typically operate with lower overhead including cheap labor, manufacturers have found these savings offset by the time and money spent transporting goods internationally. Automaker Ford Motor Company leads the car industry in reshoring manufacturing to the US. The company has found that domestic facilities actually boost design and manufacturing competitiveness.
  • Enhanced Control: Companies have found that increased dependence on distant manufacturers creates vulnerability during turbulent times. With reshoring, companies have greater oversight and control over parts and production processes. Apple recently contracted with Broadcom for US-based chip manufacturing as part of its efforts to decrease dependence on manufacturing in China.
  • Faster Time to Market: Domestic manufacturing helps speed up product time to hit the market, meaning faster responses to changes in demand. When the pandemic created a sudden need for ventilators, US companies could pivot and produce them domestically ā€“ thanks to the agility of reshored manufacturing.
  • Local Job Creation: Reshoring doesn’t just benefit manufacturers; it also stimulates local economies by creating jobs. General Electric has brought back some of its appliance manufacturing operations to Kentucky, creating hundreds of jobs and boosting the local economy. Walmartā€™s strategic plan extending through 2030 includes $350 billion in American manufacturing and 750,000 potential jobs.

Reshoring can stimulate the economy by generating jobs, fostering innovation, and improving the speed to market of goods and services. Companies want to become more resilient and less susceptible to global crises that impact their supply chain, so this trend will likely continue.

5. Digital Twins Become Increasingly Popular

Digital twins have rapidly emerged as a critical component of smart manufacturing. A digital twin replicates a physical asset or process in simulation software, enabling real-time monitoring, testing, and optimization. During manufacturing, these digital clones can encompass an entire production line, a single machine, or even a part.

Digital twins optimize operations because they are used to track, monitor, and diagnose equipment, leading to significant improvements in production efficiency and reduction in downtime. Digital twins can predict potential failures before they occur and reduce the time spent on maintenance, thereby extending the lifespan of machines.

Moreover, these virtual replicas create the ability to test changes to the production process or machinery in a risk-free environment, fostering innovation. This capability can be especially beneficial for complex or high-value manufacturing.

In addition, digital twins support the integration of manufacturing processes with other business areas such as supply chain management. By providing a real-time view of production status, they can help streamline operations and enhance coordination which results in quicker decision-making and improved responsiveness to changes in demand.

Digital twins in smart manufacturing provide the catalyst for next-generation, Industry 4.0 technologies, enhancing connectivity and automation while promoting an environment of continuous improvement and innovation.

6. Enhanced Focus on Sustainability and Carbon Neutrality

Sustainability and carbon neutrality are becoming increasingly integral components of the manufacturing sector. This shift comes from a growing awareness of the environmental impact of manufacturing activities, long-term socio-economic benefits, and the continued incentivization of sustainable practices.

Manufacturers are employing several strategies to reduce emissions and attain carbon neutrality. These include using renewable energy sources, optimizing energy efficiency in production processes, and adopting circular economy models emphasizing the reuse and recycling of materials. Such practices reduce the carbon footprint and decrease raw material consumption and waste generation.

Investments in cleaner, more efficient technology and infrastructure are critical. For instance, using AI and IoT in predictive maintenance can minimize energy waste, while advanced materials can reduce product weight and energy consumption.

The journey towards sustainability and carbon neutrality in manufacturing is challenging. Still, the rewards – a healthier environment, cost savings, enhanced brand reputation, and increased customer loyalty – make it a worthwhile pursuit.

7. Labor Shortages Will Continue to Haunt Manufacturing

Global manufacturing faces labor shortages, a problem exacerbated by an aging workforce and the onset of Industry 4.0. The widening gap between the demand for skilled labor and the supply of workers with those skills is troubling. Several measures address this issue such as companies investing in workforce development programs and training existing workers to meet the evolving needs of the industry.

Additionally, partnerships with educational institutions have been encouraging curriculum alignment with industrial requirements. Technology has come to the rescue, with automation and robotics filling in for labor-intensive roles. While these efforts have begun to mitigate the problem, a long-term strategic approach to workforce planning and development remains essential to tackle future labor shortages in manufacturing.

CNC Masters in 2024 and Beyond

Driven by technological advancements, changing consumer preferences, and a greater emphasis on sustainability, the manufacturing landscape in 2024 is evolving rapidly. Since our founding in 1990, CNC Masters has worked to provide the machines you need to adapt to change and harness new technologies to stay competitive in 2024 and beyond.

About Peter Jacobs

Peter Jacobs is the Senior Director of Marketing at CNC Masters, a leading supplier of CNC mills, milling machines, and CNC lathes. He is actively involved in manufacturing processes and regularly contributes his insights for various blogs in CNC machining, 3D printing, rapid tooling, injection molding, metal casting, and manufacturing in general. You can connect with him on his LinkedIn.

Have Questions? Need a Quote?

Looking for more information about our CNC machines and services? Contact us today.

Contact

Slide 1

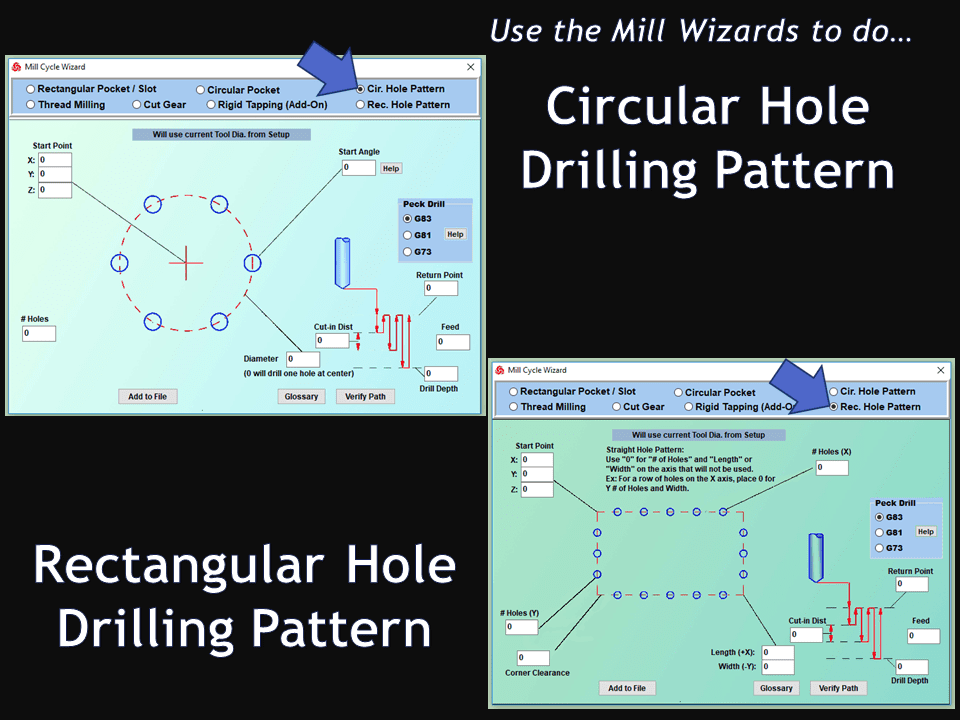
29. Create a Peck Drilling Program in Circular or Rectangular Patterns
Using the Circular or Rectangular Drilling Wizards, you can program the machine to drill an un-limited series of holes along the X and Y planes. Program it to drill straight through to your total depth, use a high-speed pecking cycle, or deep hole pecking cycle. You can program the cut-in depth and return point for a controlled peck drill application to maximize chip clearance.

Slide 1

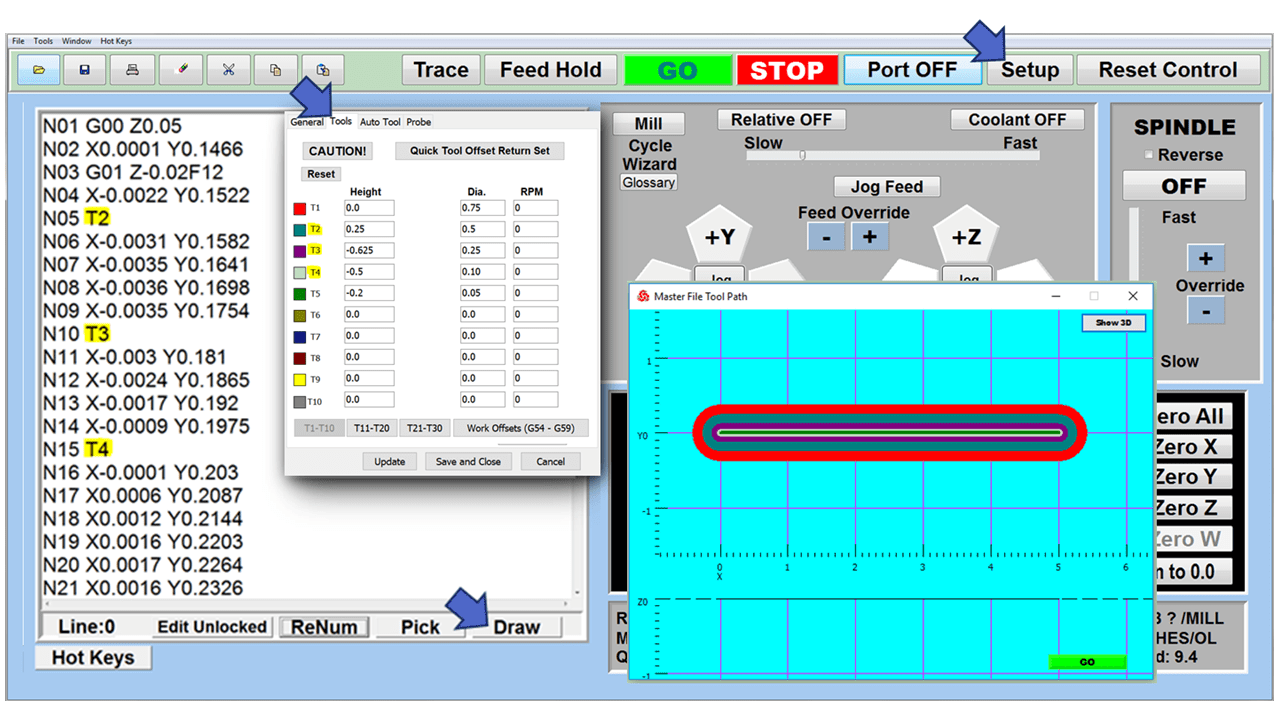
20. Change up to 30 tools with compensation, and store your tool offsets for other programs
The MX supports…

Slide 1

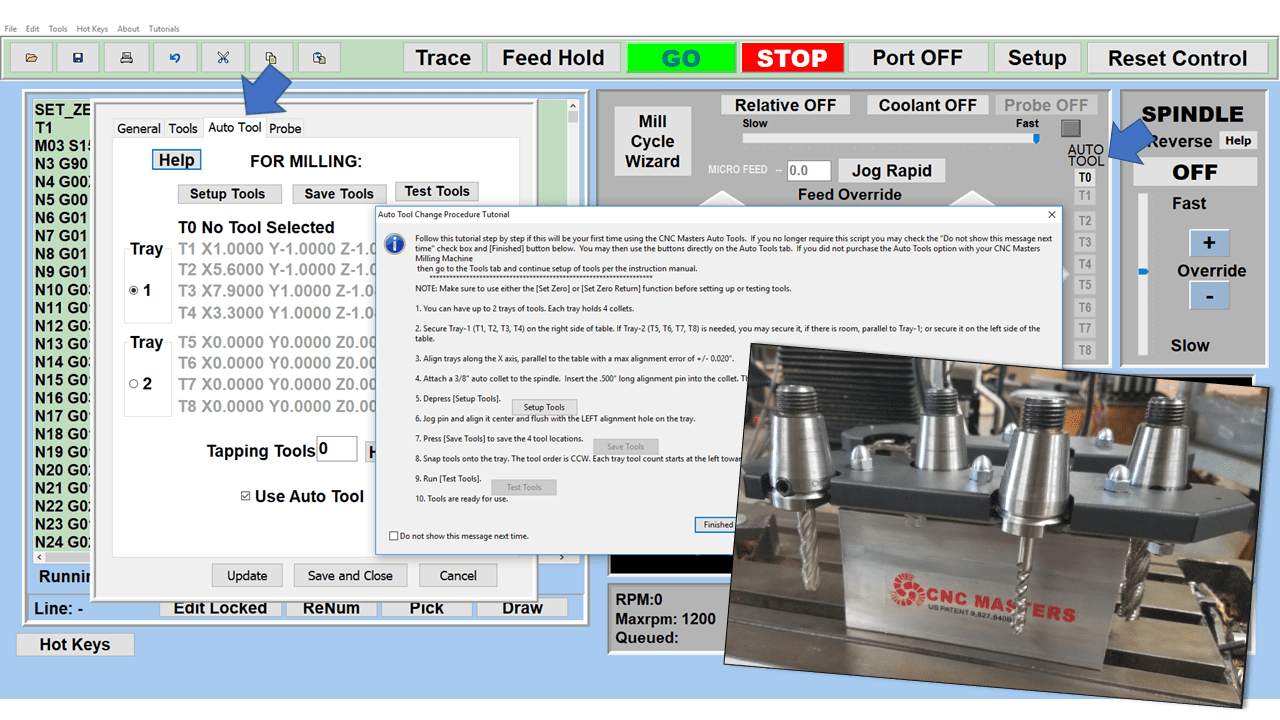
21. Use the optional ATC rack up to 8 tools for milling, drilling, and rigid tapping applications
The CNC Masters Automatic Tool Changer Rack and Tools (US Patent 9,827,640B2) can be added to any CNC Masters Milling Machine built with the rigid tapping encoder option. The tutorial will guide you through the set-up procedure using the ATC tools.

Slide 1

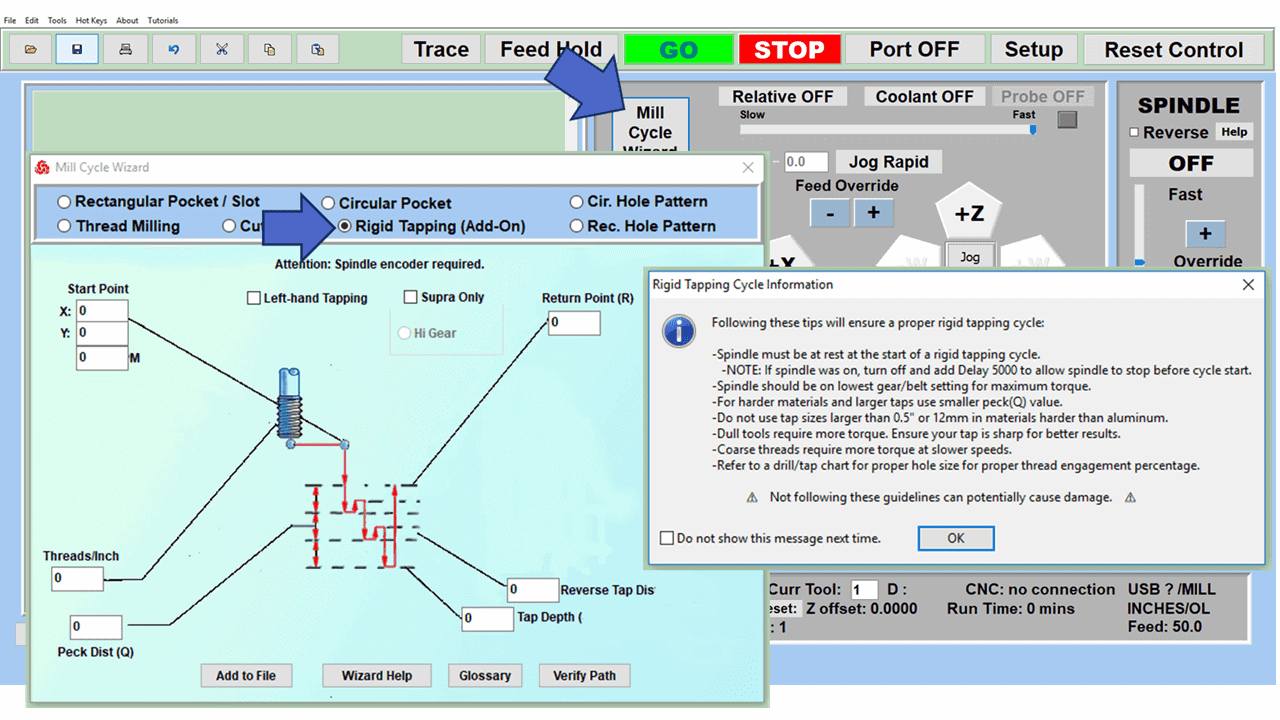
22. Use the optional Rigid Tapping Wizard without the need for tapping head attachments
When you order your CNC Masters machine, have it built with the optional rigid tapping encoder. You can take any drill cycle program and replace the top line with a tapping code created by the wizard to tap your series of holes up to 1/2ā€ in diameter.

Slide 1

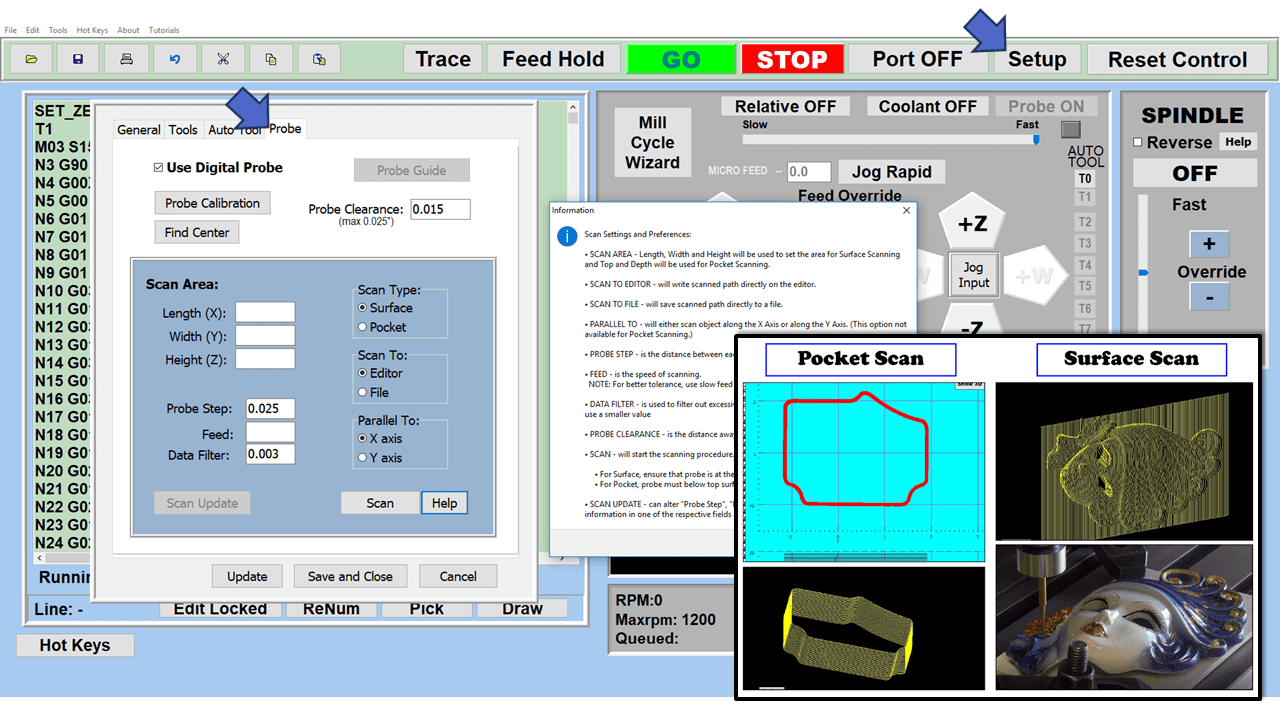
23. Use the optional Digital Probe to scan the profile and/or pockets of your fun/hobby type designs to write your tool path program and machine out a duplicate of your original design To ā€œsurfaceā€ scan an object, you can program the probe along the X or Y plane. The stylus will travel over the part starting on the left side front corner of the object and work its way to the end of the part on the right side. Depending on how the stylus moves, it will record linear and interpolated movements along the X, Y, and Z planes directly on the MX Editor.
To ā€œpocketā€ scan an object containing a closed pocket such as circles or squares, the scan will start from the top front, work its way inside of the pocket, and scan the entire perimeter of the pocket.
Under the Setup of the MX software you will find the Probe Tab which will allow you to calibrate and program your probe. Your ā€œProbe Stepā€, ā€œFeedā€, and ā€œData Filterā€ can also be changed on the fly while the probe is in the middle of scanning your object.

Slide 1

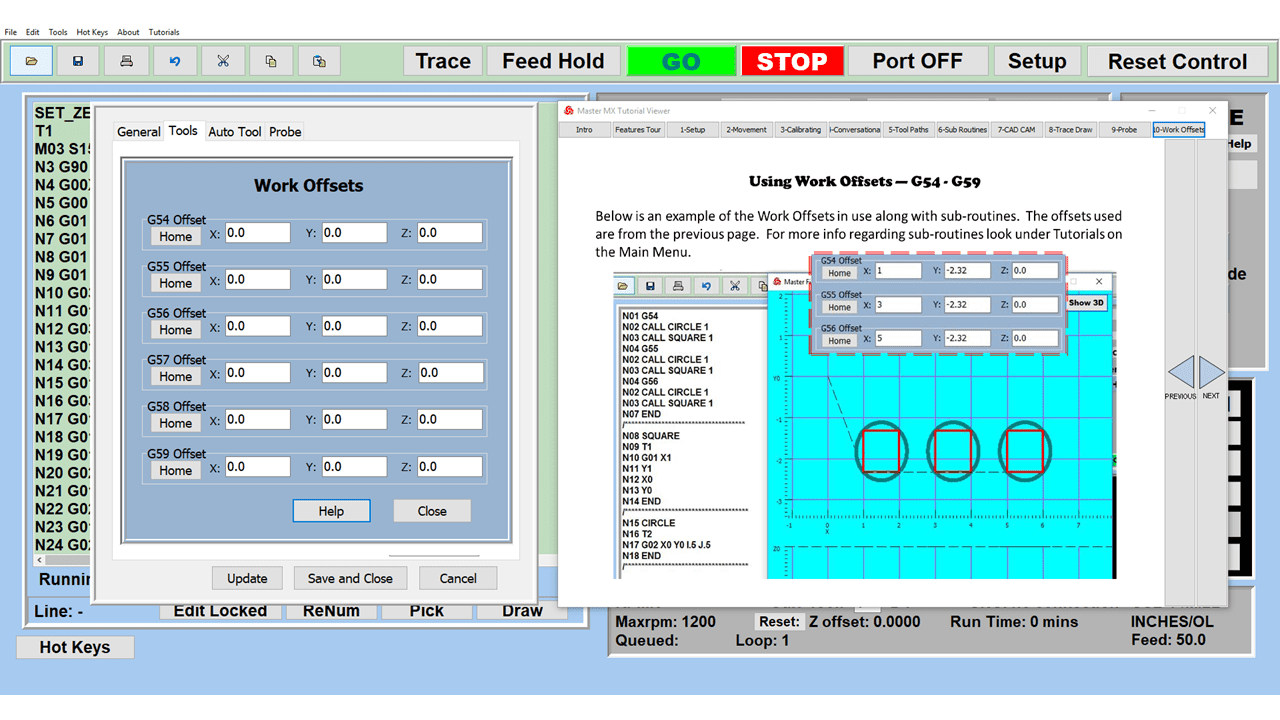
24. Use work offsets G54-G59 for nesting applications
The work offsets offer you a way to program up to six different machining locations. Itā€™s like having multiple 0.0 locations for different parts. This is very useful especially when using sub-routines/nesting applications.

Slide 1

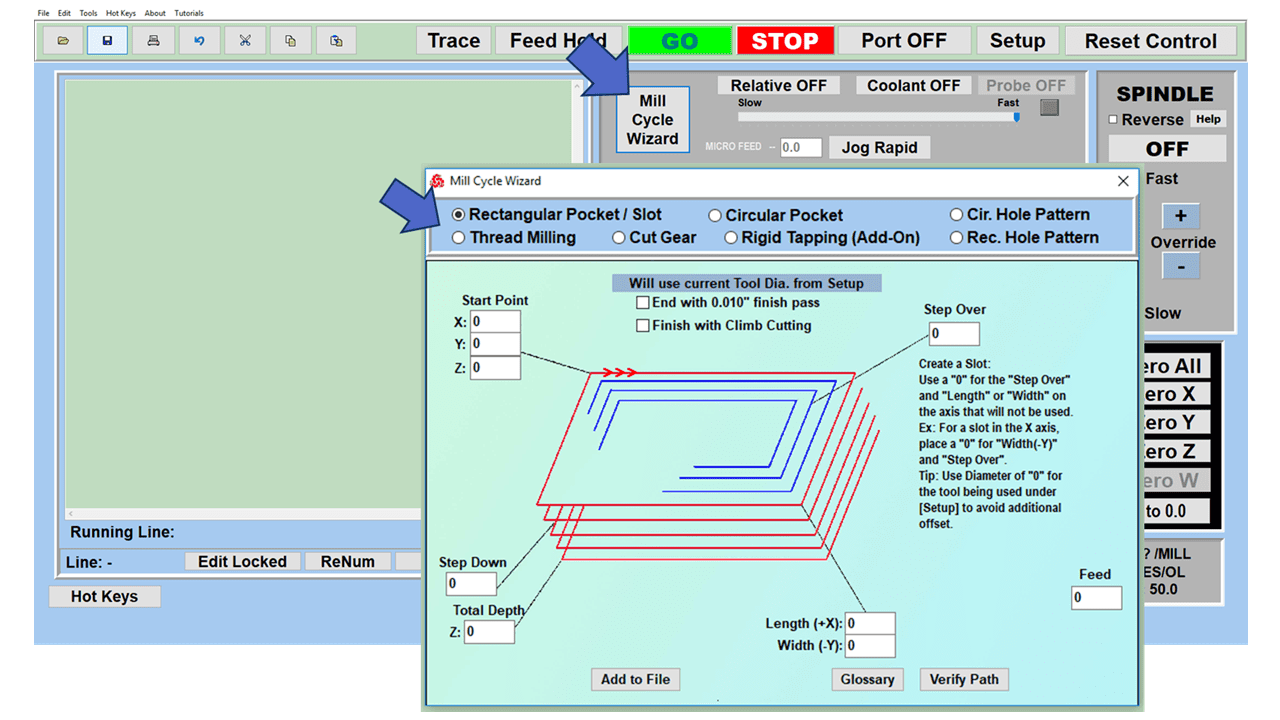
25. Create a Rectangular Pocket / Slot with our selection of Wizards to help you build a tool path program
The Cycle Wizards for the mill or lathe makes it easy to create a simple tool path without needing to use a CAD and CAM software.
On this Wizard, the Rectangular Pocket / Slots, can be used to form a deep rectangular pocket into your material or machine a slot duplicating as many passes needed to its total depth.

Slide 1

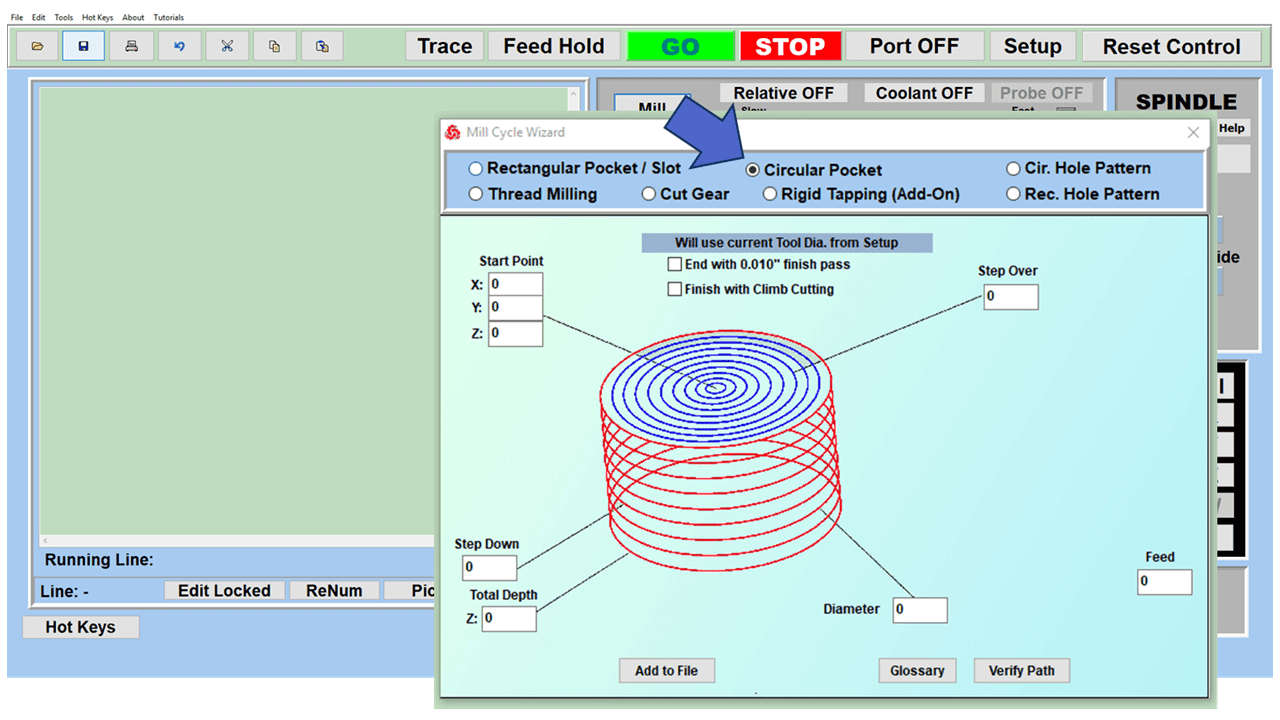
26. Create a Circular Pocket Wizard
Input the total diameter, the step down, and total depth and the code will be generated.

Slide 1

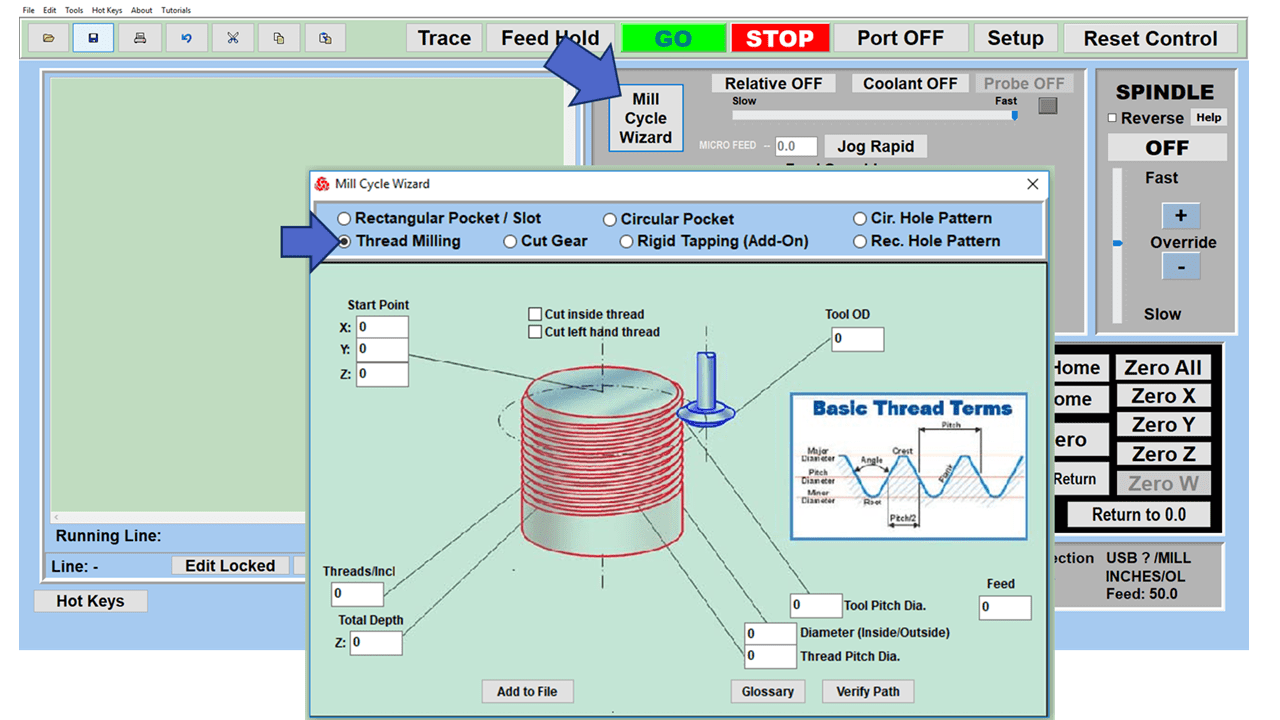
27. Do Thread Milling using a single point cutter Wizard

Slide 1

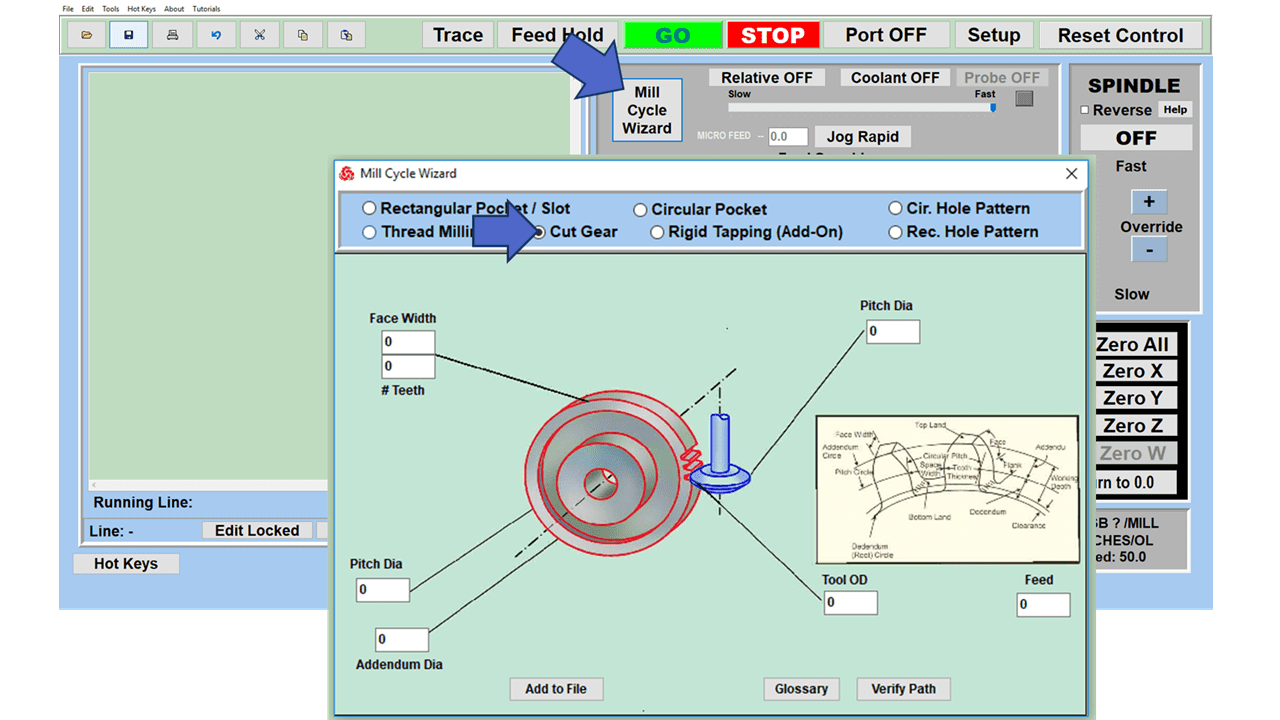
28. Cut a gear out using the Cut Gear Wizard with the optional Fourth Axis

Slide 1

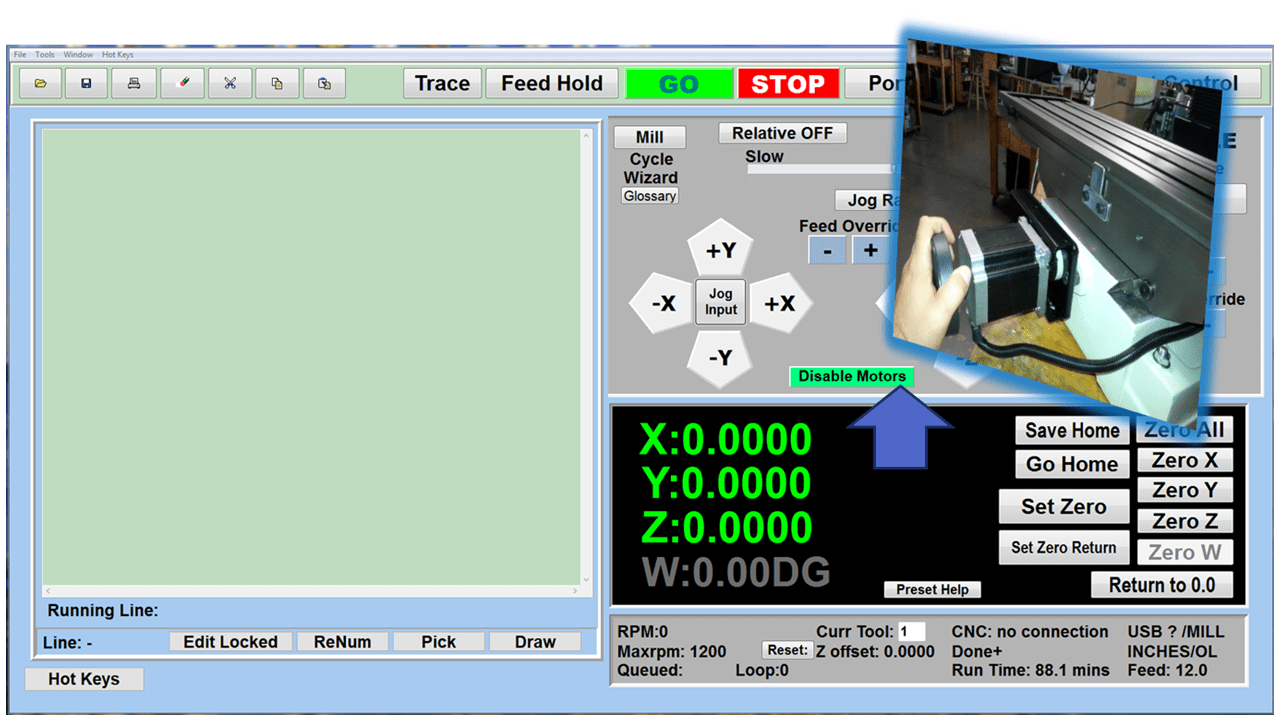
19. Disable the axis motors to manually hand crank each axis into place
Easily de-energize the axis motors by clicking [Disable Motors] to crank each axis by hand, and then press [Reset Control] to re-energize the axis motors.

Slide 1

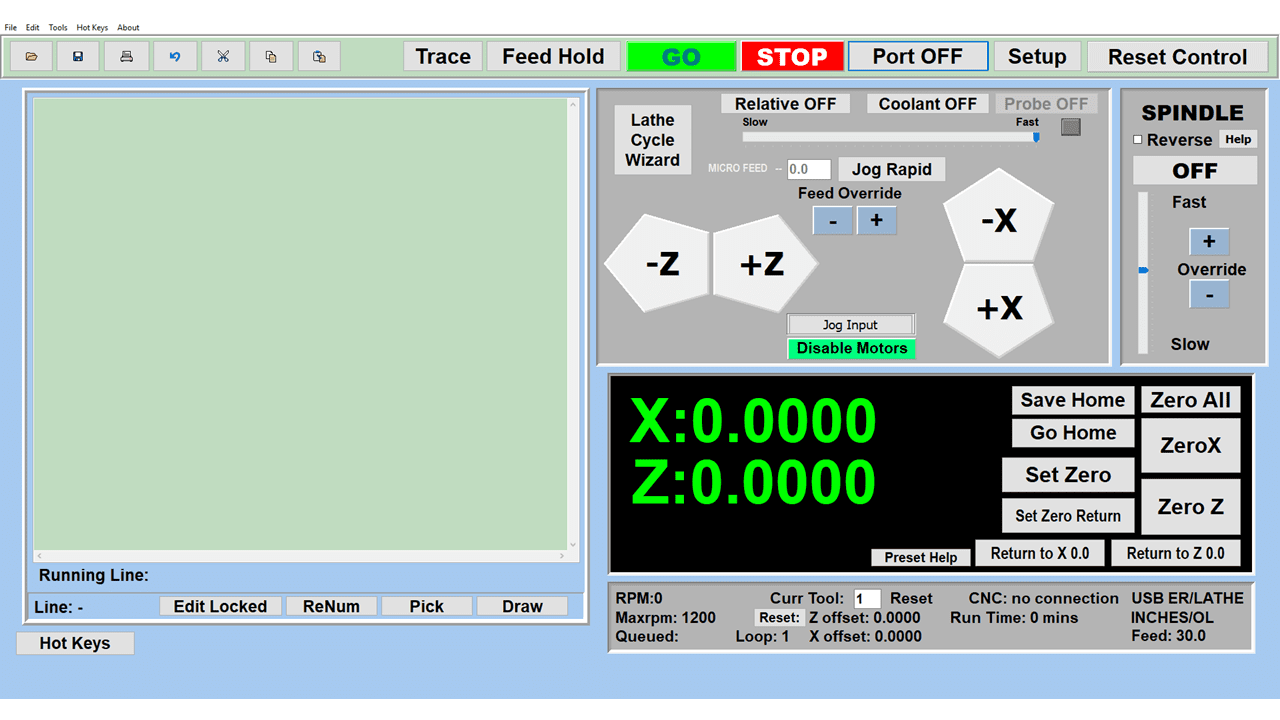
30. The MX interface can easily be interchanged from Mill Mode to Lathe Mode
Use this interface for your CNC Masters Lathe. It contains all the same user-friendly features and functions that comes in Mill Mode. Simply go to the Setup page and change the interface.

Slide 1

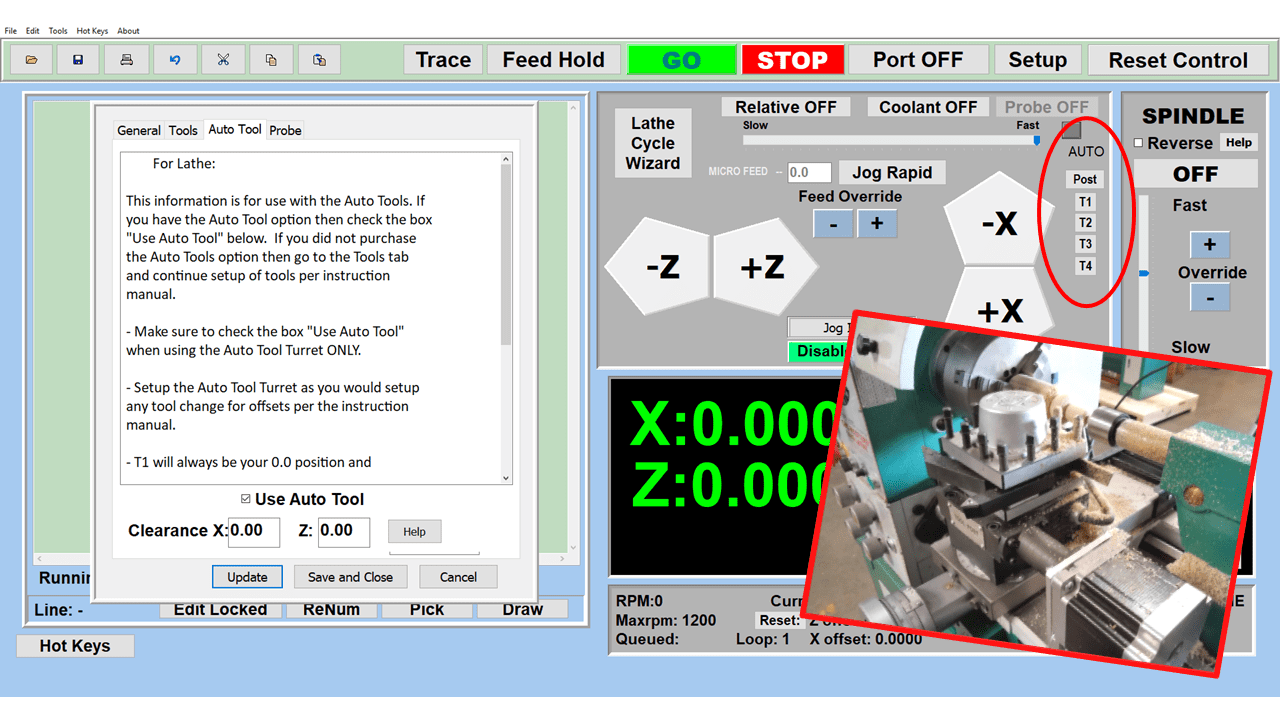
31. Use Tool Change Compensation or the optional Auto Tool Changer Turret if your application requires more than one tool in a single program
You can offset the length and angle of each tool and record it under Tools in your Setup. The program will automatically pause the latheā€™s movement and spindle allowing you to change out your tool, or allowing the optional ATC Turret to quickly turn to its next tool and continue machining.
On the MX interface, you also have four Tool Position buttons. Select your desired T position, and the auto tool post will quickly turn and lock itself to that position.

Slide 1

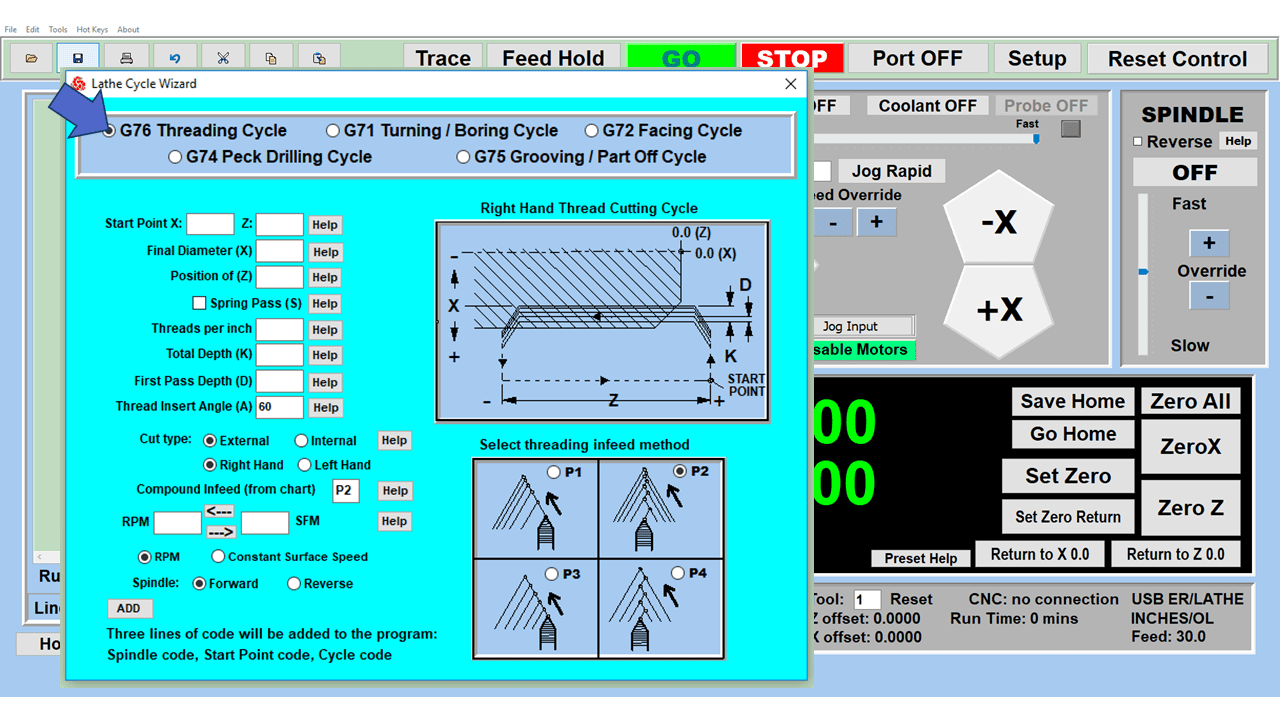
32. Use the Lathe Wizard Threading Cycle to help you program your latheā€™s internal or external threads in inches or metric

Slide 1

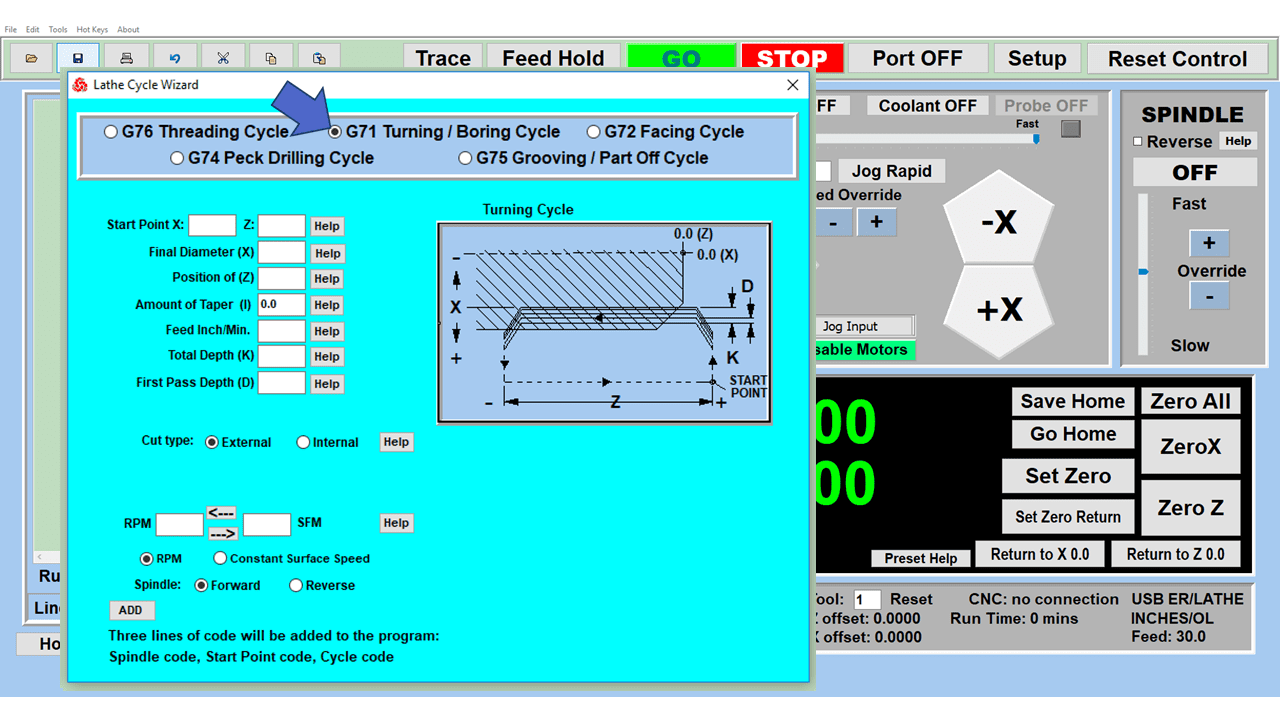
33. Use the Lathe Wizard Turning / Boring Cycle to help you program simple turning and boring cycles without having to go through a CAM or writing a long program with multiple passes

Slide 1

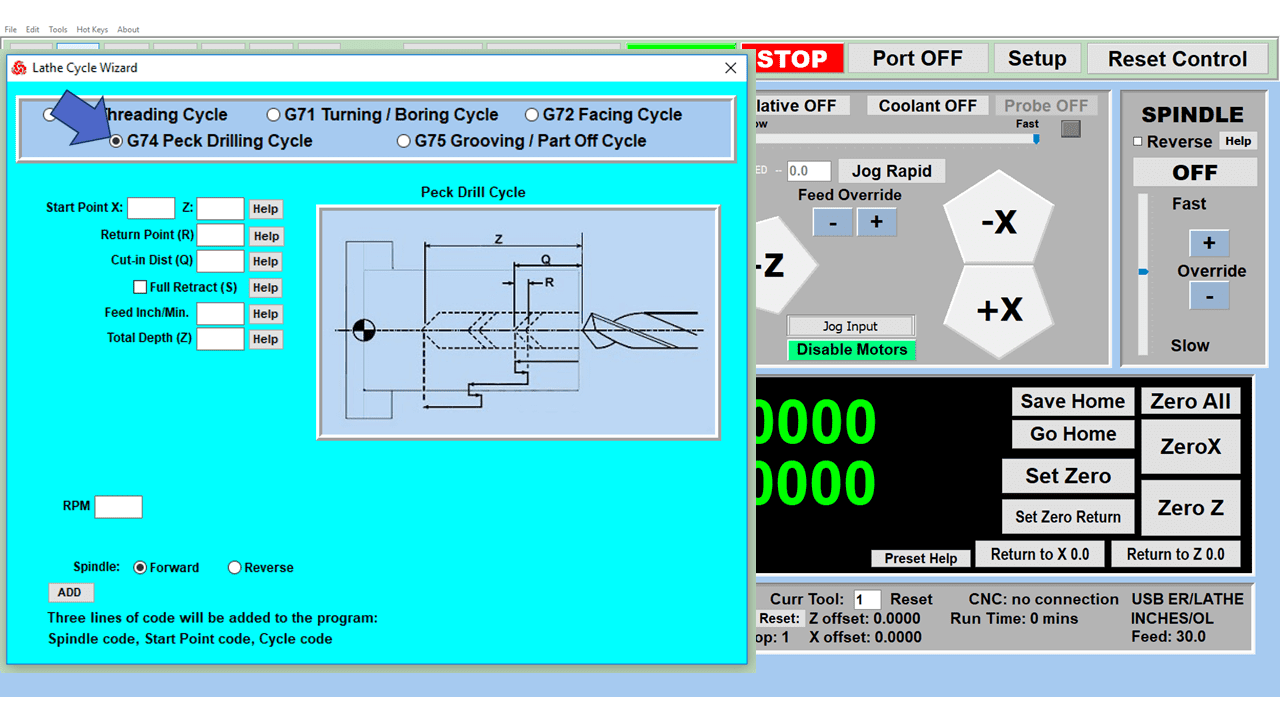
34. Use the Lathe Wizard Peck Drilling Cycle to help you program your drill applications or for face grooving

Slide 1

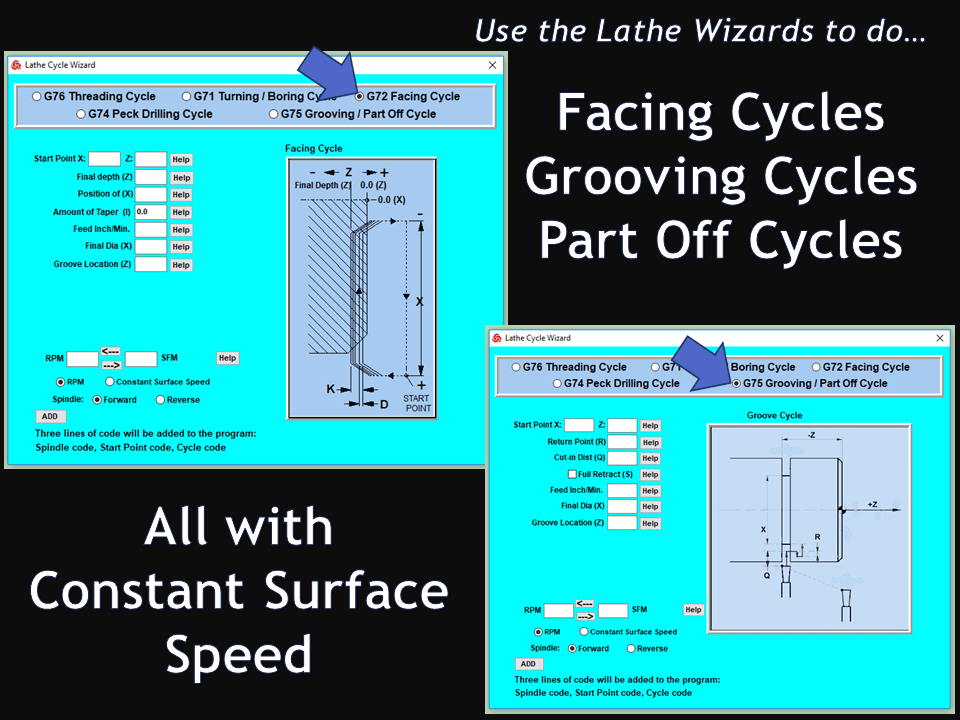
35. Facing / Grooving / Part Off Cycle Wizards ā€“ with Constant Surface Speed
These cycles can be used with Constant Surface Speed allowing the spindle speed to increase automatically as the diameter of the part decreases giving your application a consistent workpiece finish. With CSS built into the wizard, there is no need to break down the cycle into multiple paths and multiple spindle speed changes.

Slide 1

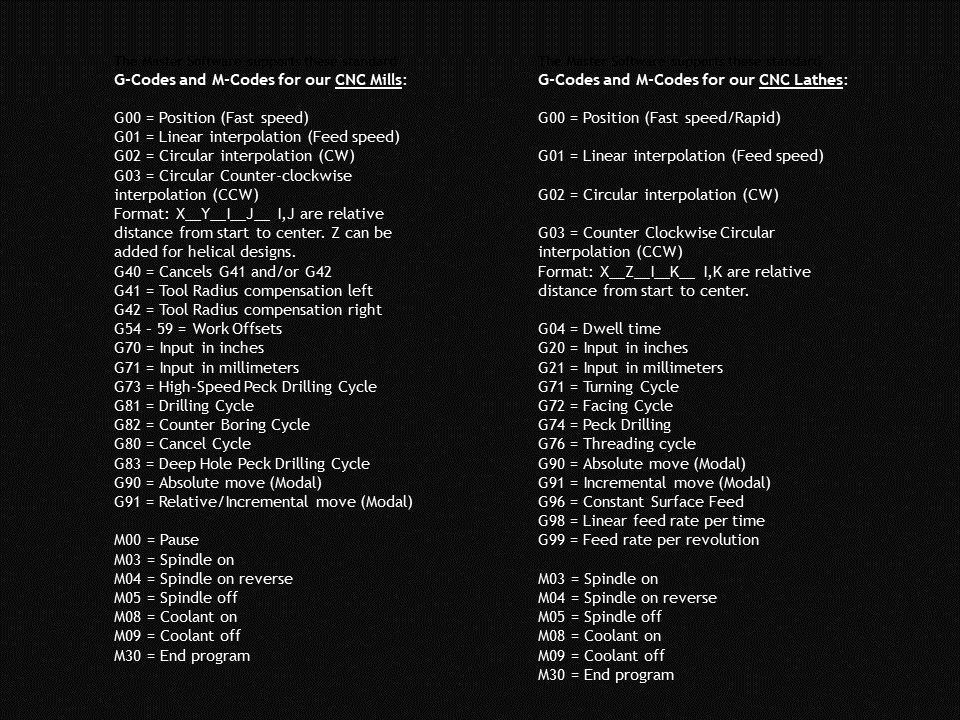
36. This is our list of supported G and M codes which can be found under Tools > G Code/ M Code List in the MX
If you plan to use a third-party CAM software to generate your tool path program, use a generic FANUC post processor and edit it to match our list of codes. As an option, we also sell Visual mill/turn CAM software which comes with a guaranteed post processor for our machines to easily generate your tool path programs based on your CAD drawings.

Slide 1

37. Our pledge to you…

Slide 1

10. Run each tool path independently to study its movement
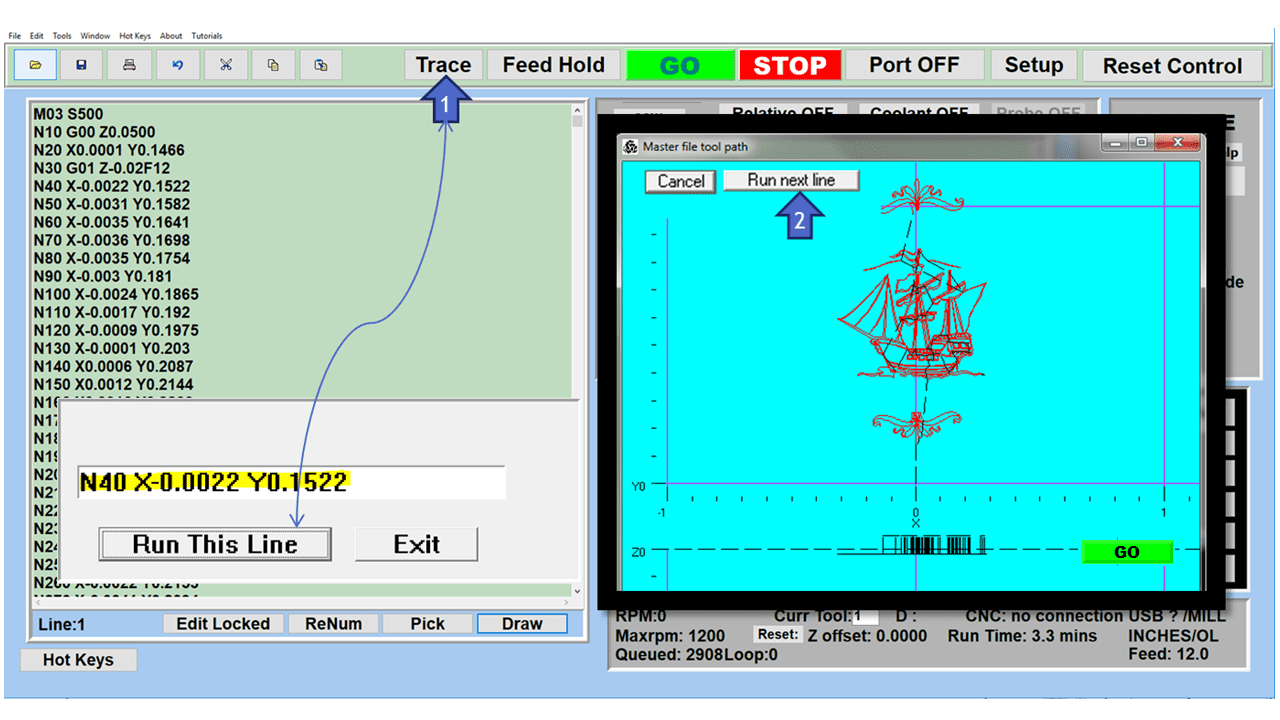
1. Run the machine on Trace mode. You can run each tool path independently, one line at a time to study the tool path movement on the machine to verify the position of the application and if any fixture/vise is in the way of the cutterā€™s path.

2. You can also verify your program by clicking on the Trace and Draw buttons together. This will allow you to view each tool path independently one line at a time in the Draw Window.

Slide 1

2. Clutter Free Interface
The MX is engineered for the CNC MASTERS machine so you do not have to fiddle with a detailed complicated configuration that can be overwhelming. Just load in the MX and start machining!2. Clutter Free Interface
The MX is engineered for the CNC MASTERS machine so you do not have to fiddle with a detailed complicated configuration that can be overwhelming. Just load in the MX and start machining!

Slide 1

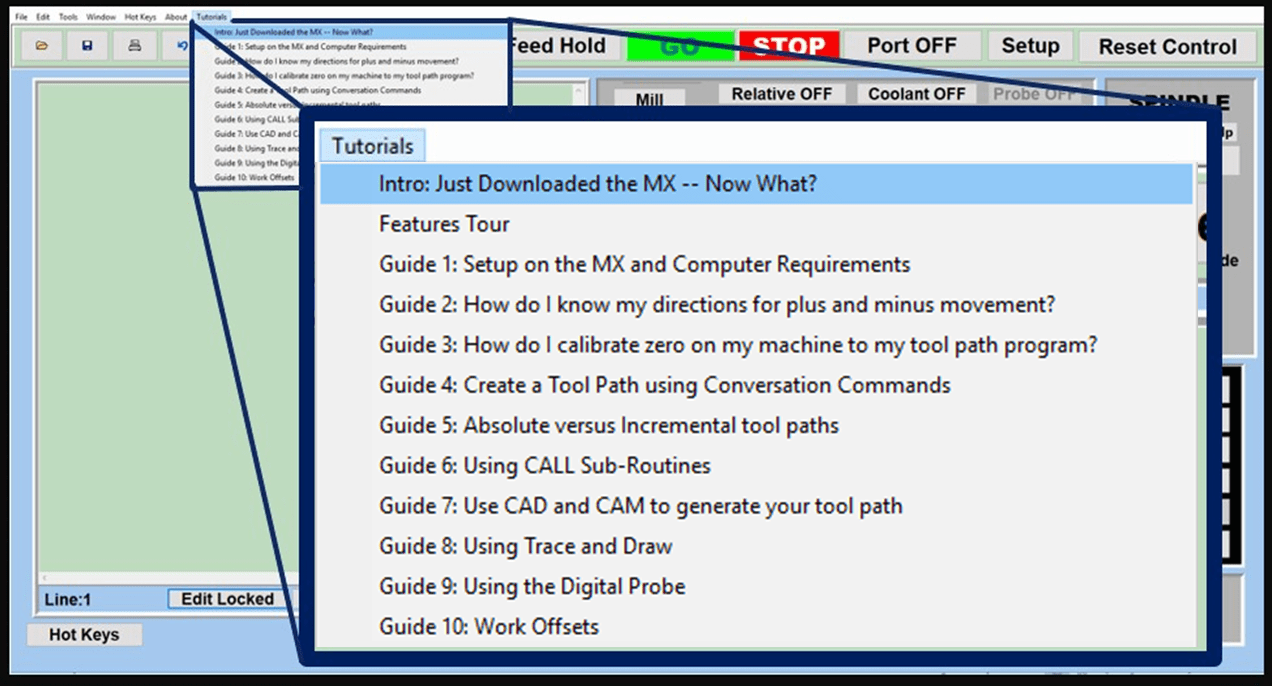
3. Features Tour and Tutorials Included
The Features Tour will give you a quick run-down on all the features the MX can do for you. The Tutorials are easy to follow even for the first time CNC machinist.
Feel free to download the MX on any of your computers. We recommend downloading the MX along with your CAD and CAM software there at the comfort of your office computer to generate your tool path programs. You donā€™t need to be hooked up to the machine either to test your program in simulation mode.

Slide 1

4. Navigate and Edit Your Program through the MX interface with Ease
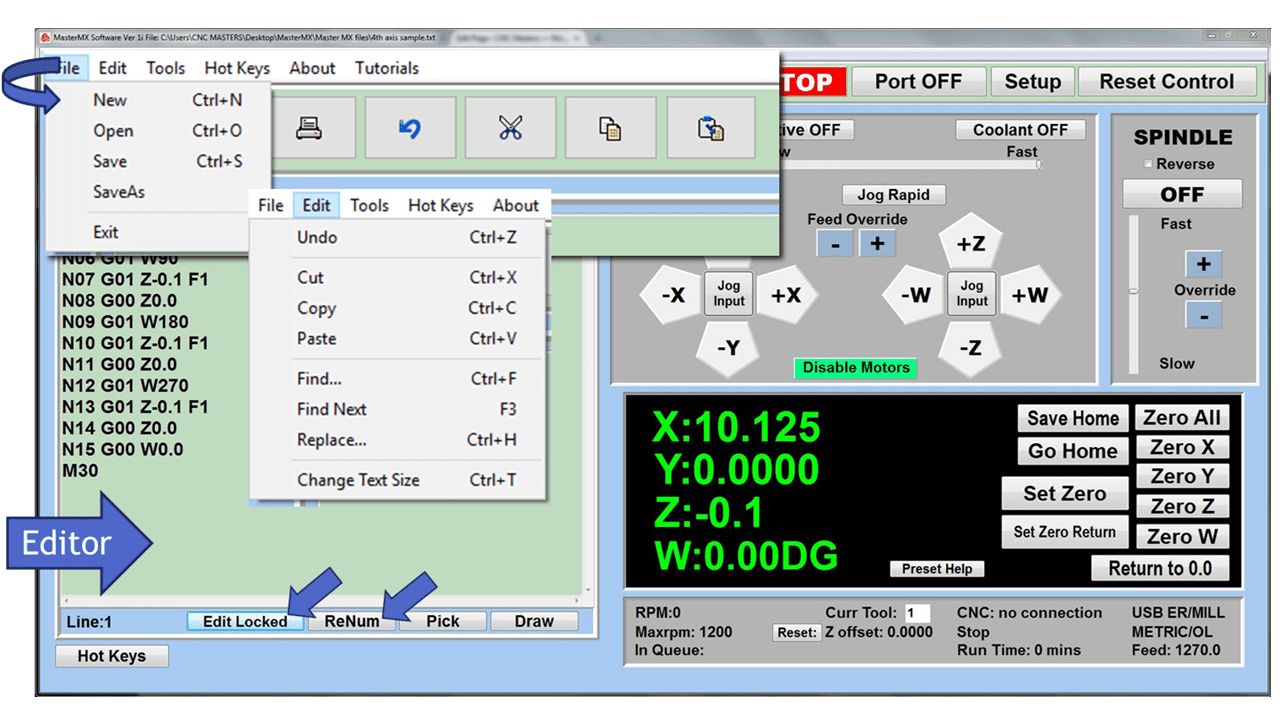
With a few clicks of the mouse or using touch screen technology, you can easily navigate through the MX interface importing saved programs into the Editor from the File drop down menu. Using standard windows features to edit your program you can then lock the Editor Screen to avoid accidental editing, and if you need to insert a line in the middle of a program, just click on [ReNum] to re-number your tool path list.
You can create a program or import CAM generated G-code tool paths into the Editor
The X Y and Z W arrow jog buttons are displayed from the point of view of the cutter to avoid confusion when the table and saddle are moving. You can also adjust your spindle speed and coolant control while jogging each axis.

Slide 1

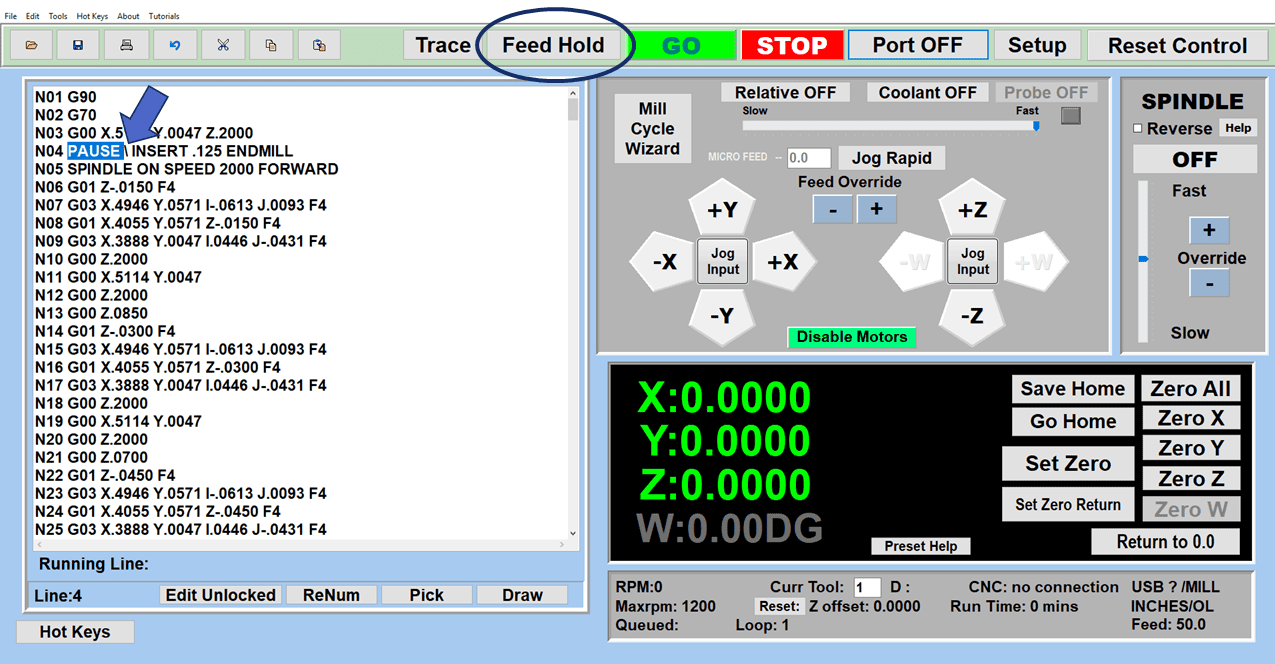
5. Feed Hold ā€“ Pause in the Middle of your Program
Feed Hold lets you pause in the middle of a program. From there you can step through your program one line at time while opting to shut the spindle off and then resume your program.
You can also write PAUSE in the middle of your program and jog each axis independently while your program is in pause mode.

Slide 1

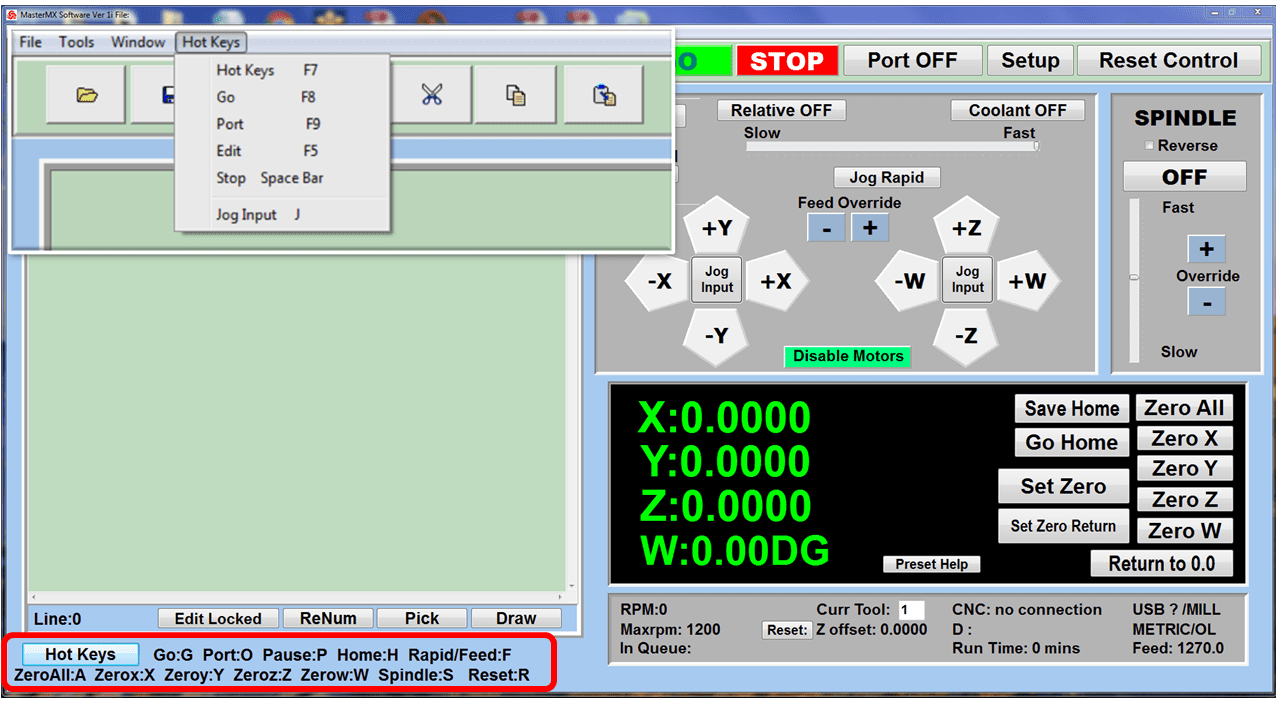
6. Hot Keys
Hot Keys is an alternative method to easily control your machine using your hard or touch screen keyboard. One can press P to pause a program, press S to turn Spindle On, G to run a program, Space Bar to Stop, J to record your individual movements one line at a time to create a program in teach mode.

Slide 1

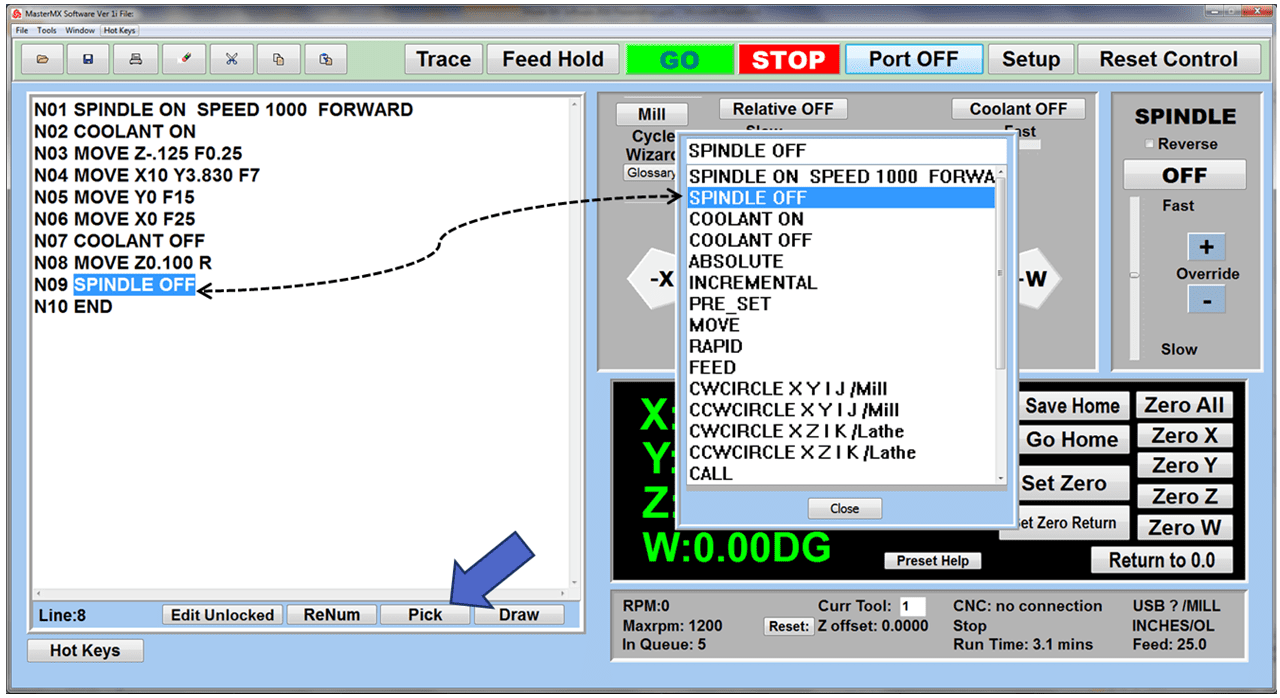
7. Pick Menu ā€“ for conversational mode programming
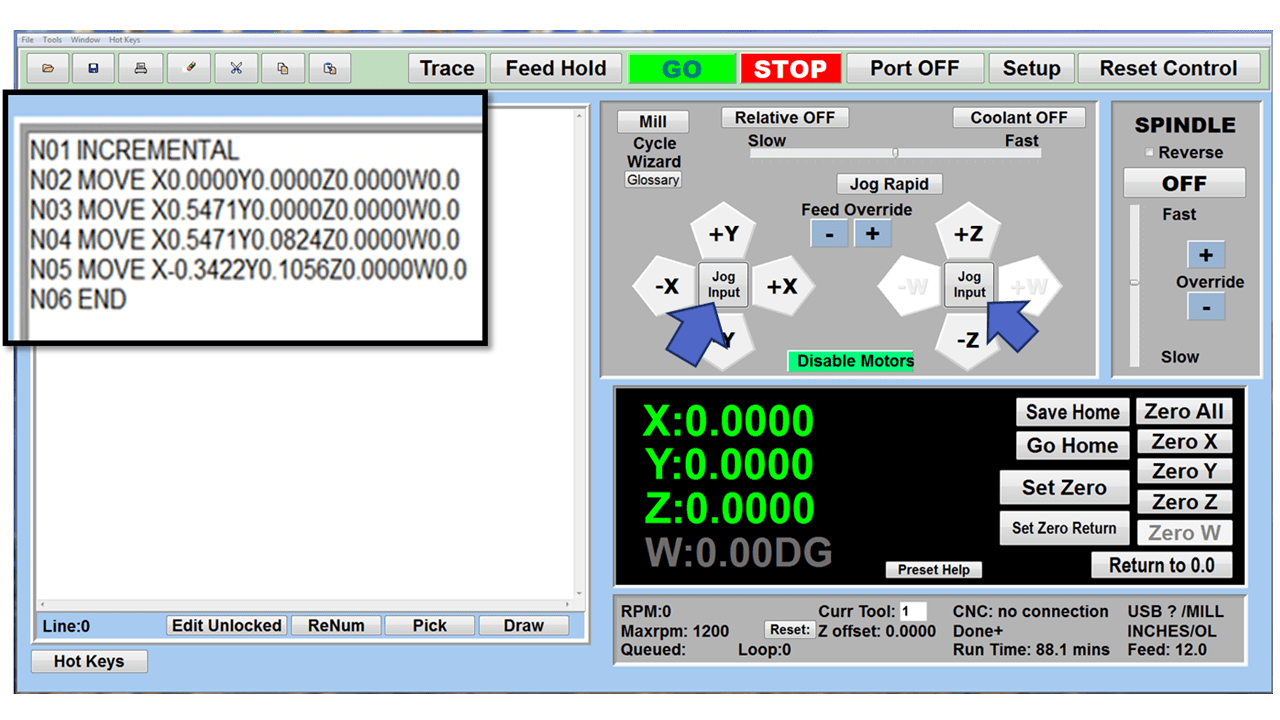
Write FANUC style G-codes directly into the Editor or select commands off the [Pick] menu and write your tool path program in conversational mode such as what is written in the Editor box. You can even mix between conversation commands and G-codes in the same program.

Slide 1

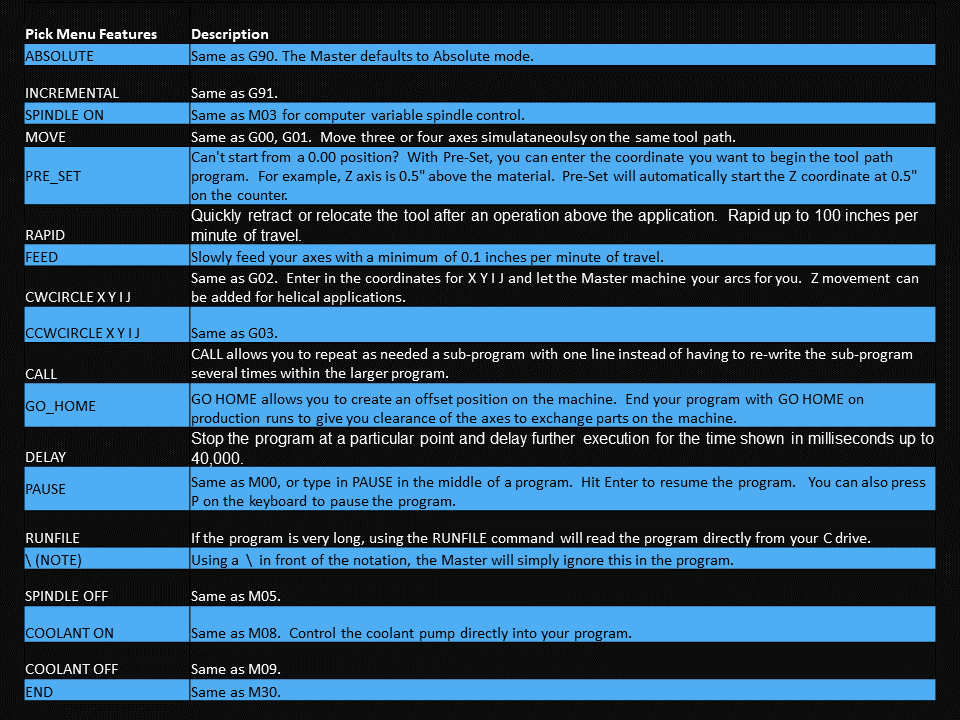
8. Pick Menu List of Options
Use commands such as MOVE, SPINDLE ON/OFF, COOLANT ON/OFF, PAUSE, DELAY, GO HOMEā€¦. to write your tool path programs in conversational mode.

Slide 1

9. Draw the Tool Path to verify it before pressing Go
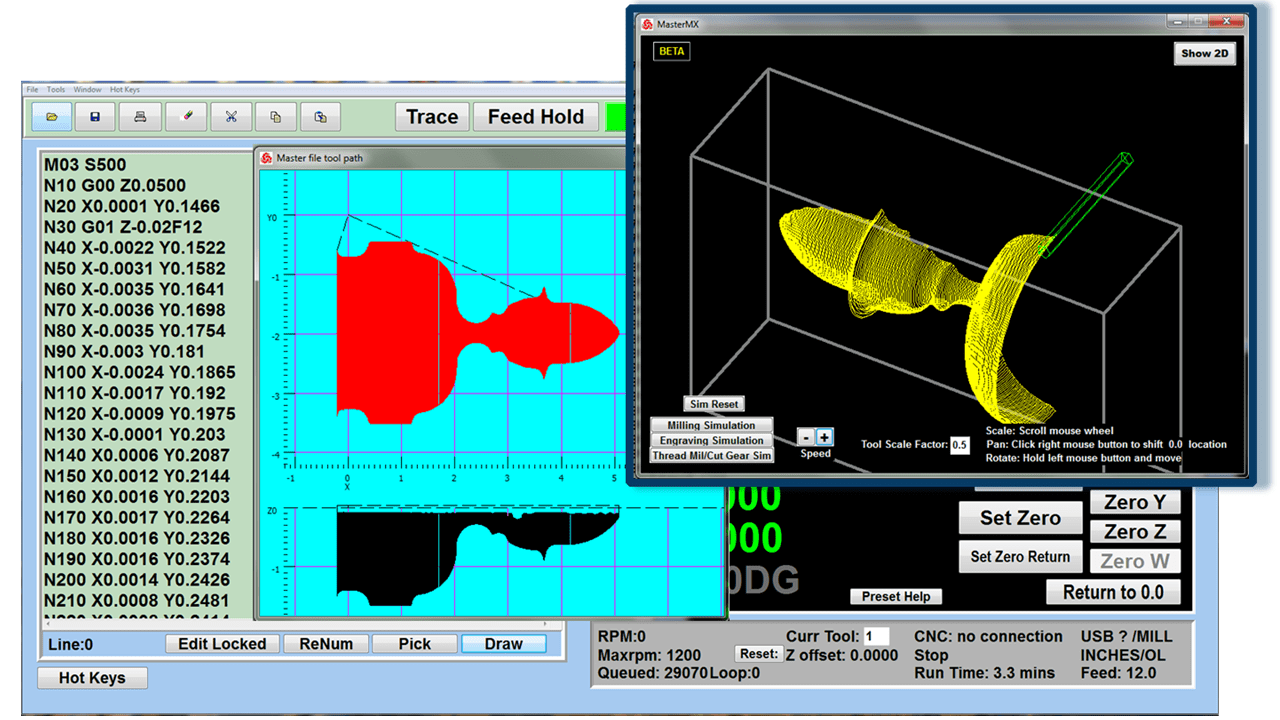
Hit Draw to view your tool path program drawing, check out its run time, or even simulate the tool path in 3D mode. This can be helpful to quickly verify your program before running it. You can also slow down or speed up the drawing or simulation process.
You can also hit Go within the Draw Window itself to verify the cutterā€™s position on the machine. The current tool path will be highlighted and simultaneously draw out the next path so you can verify what the cutter will be doing next on the program.

Slide 1

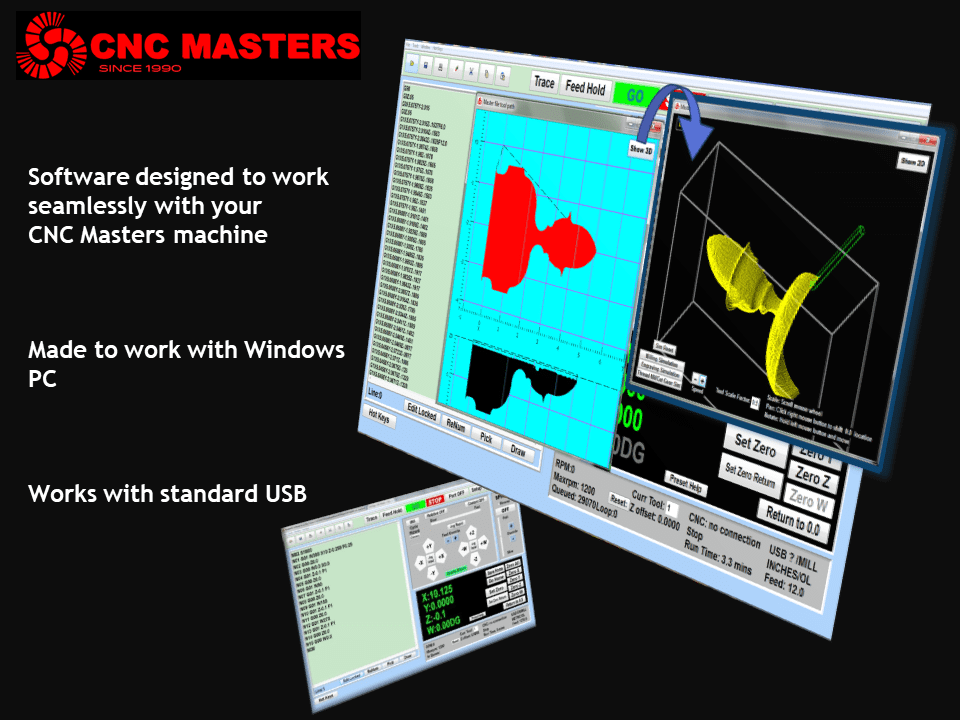
MX Software ā€“ Easy to Use, Easy to Learn ā€“ Included with your machine purchase
The MX software is designed to work seamlessly with your CNC Masters machine. It is made to work with Windows PC ā€“ desktop, laptop, or an all in one ā€“ on standard USB. Use it on Windows 8 or 10 64-bit operating systems.
No internal conversion printer/serial port to USB software or additional conversion hardware is used with the MX.

Slide 1

11. Counters display in Inches or Millimeters ā€“ Continuous Feed
1. When running a program, the counters will display a ā€œreal-timeā€ readout while the machine is in CNC operation without counting ahead of the movement.
2. The current tool path is highlighted while the machine is in operation without causing slight interruptions/pauses as the software feeds the tool path to the machine. The MX internally interprets a program ten lines ahead to allow for ā€œcontinuous machiningā€ avoiding slight interruptions as the machine waits for its next tool path command.
3. ā€œRun Timeā€ tells you how long it takes to run your tool path program.

Slide 1

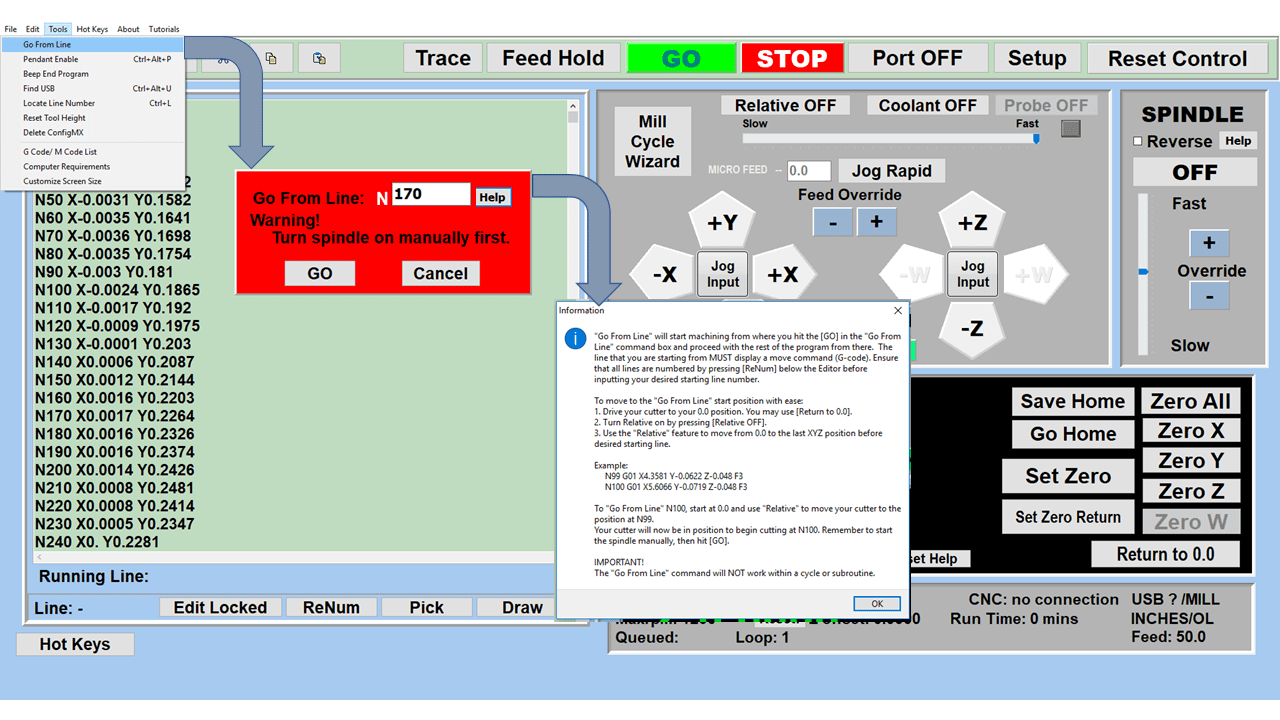
12. Use the ā€œGo From Lineā€ command to start in the middle of your program
If you ever need to begin your program from somewhere in the middle of it, use [Go From Line] which you can find under Tools. The Help guide will walk you through how to position the cutter without losing its position on the machine.

Slide 1

13. Exact Motion Distance without over-stepping on an axis while jogging
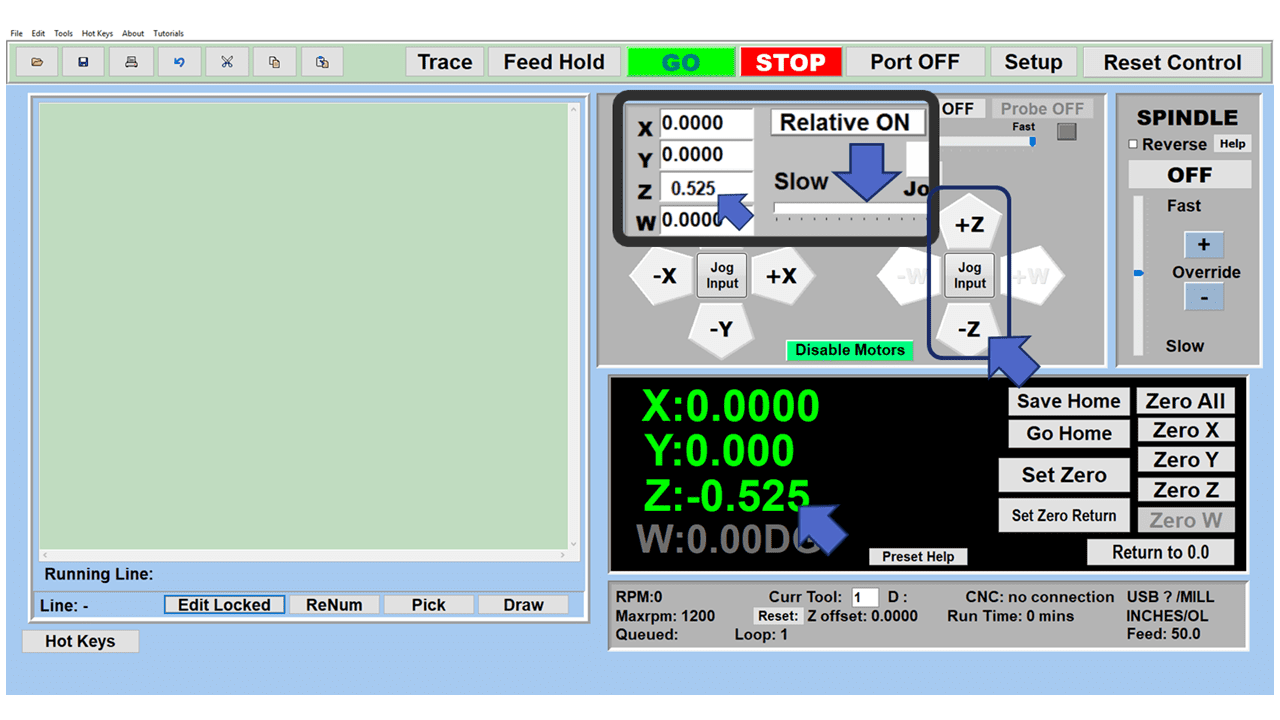
Use ā€œRelative ONā€ to enter a specific coordinate to jog any of your axes to an exact location without having to write a program. Itā€™s like using ā€œpower feedā€ but easier. You can jog an exact distance on any of the axes without needing to keep the key pressed down and mistakenly over-step the movement releasing your finger too slowly off the jog button.
Letā€™s say you need to drill a hole exactly 0.525ā€ using the Z. So you enter 0.525 in the Z box. Next, adjust the JOG FEED RATE slider for the desired feed rate. Then ā€œclick onceā€ on the +Z or -Z button to activate the travel. In this case you click once the -Z button first to drill the hole exactly 0.525ā€. Then click once on the +Z button to drive the axis back up 0.525ā€.

Slide 1

14. Teach Mode ā€“ Jog Input
You can create a tool path program by storing each point-to-point movement by simply jogging an axis one at a time. Click on either of the Jog Input buttons to store each movement on the Editor Screen. You can then add Spindle ON, feed commands, and press GO to run the new program as needed. This is a great feature to help you learn to create a program by the movements you make on the machine without necessarily writing out an entire program first.
Slide 1

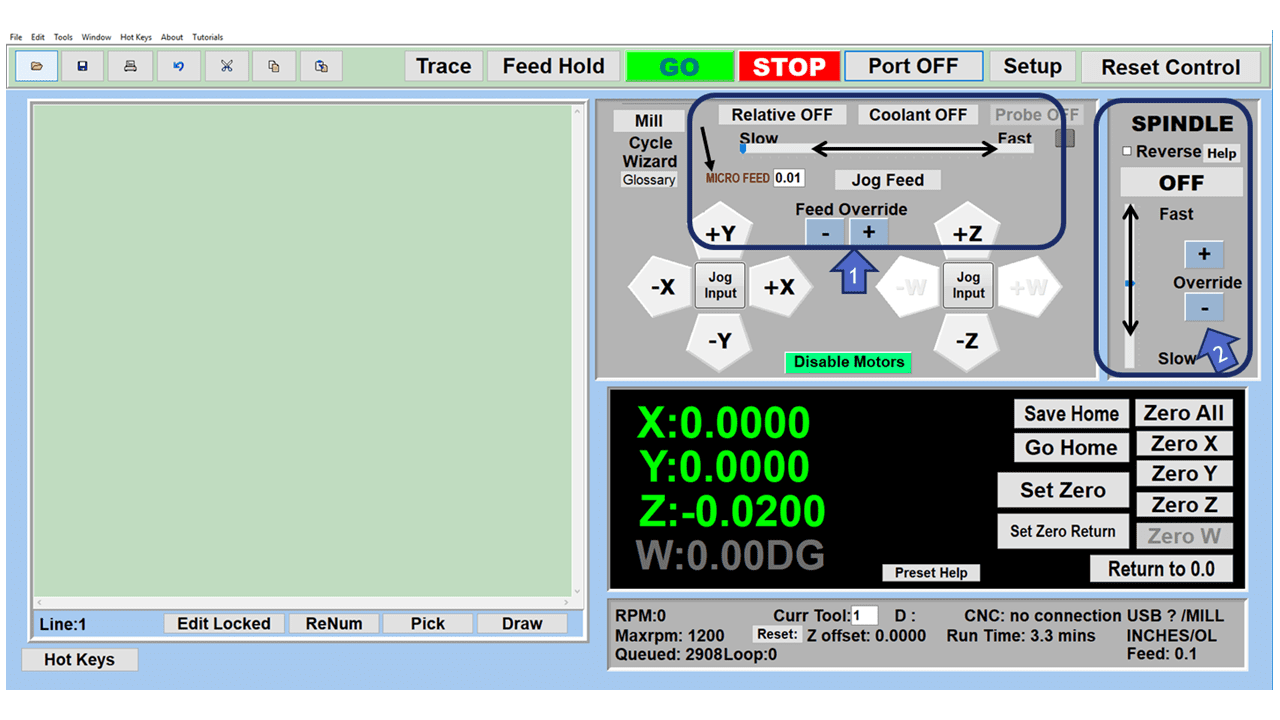
15. Override on the fly to adjust the Jog Feed to Rapid or the Spindle Speed during the middle of a program
1. Jog Feed and Rapid with Override: You can adjust feeds using the slider from slow minimum 0.1ā€³ per minute to a rapid of 100ā€³ per minute of travel. You can even micro-step your jog as low as 0.01ā€/min. The [-][+] buttons allow you to fine tune feeds in 5% increments while the program is in motion.
2. Spindle Speed with Override: You can adjust speeds using the slider from a slow minimum RPM to the max RPM according to the machine setup. The [-][+] buttons allow you to fine tune feeds in 5% increments while the program is in motion.

Slide 1

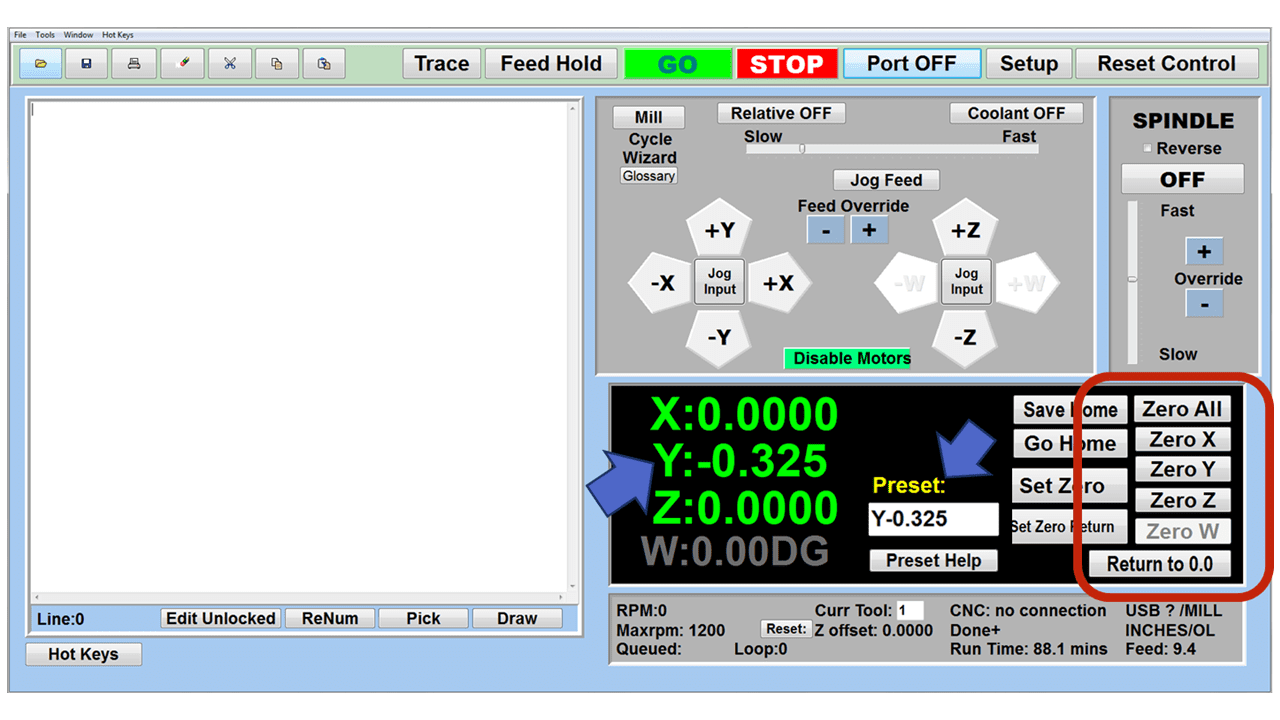
16. Adjust Counters using Pre-Set if you cannot begin the program from 0.00
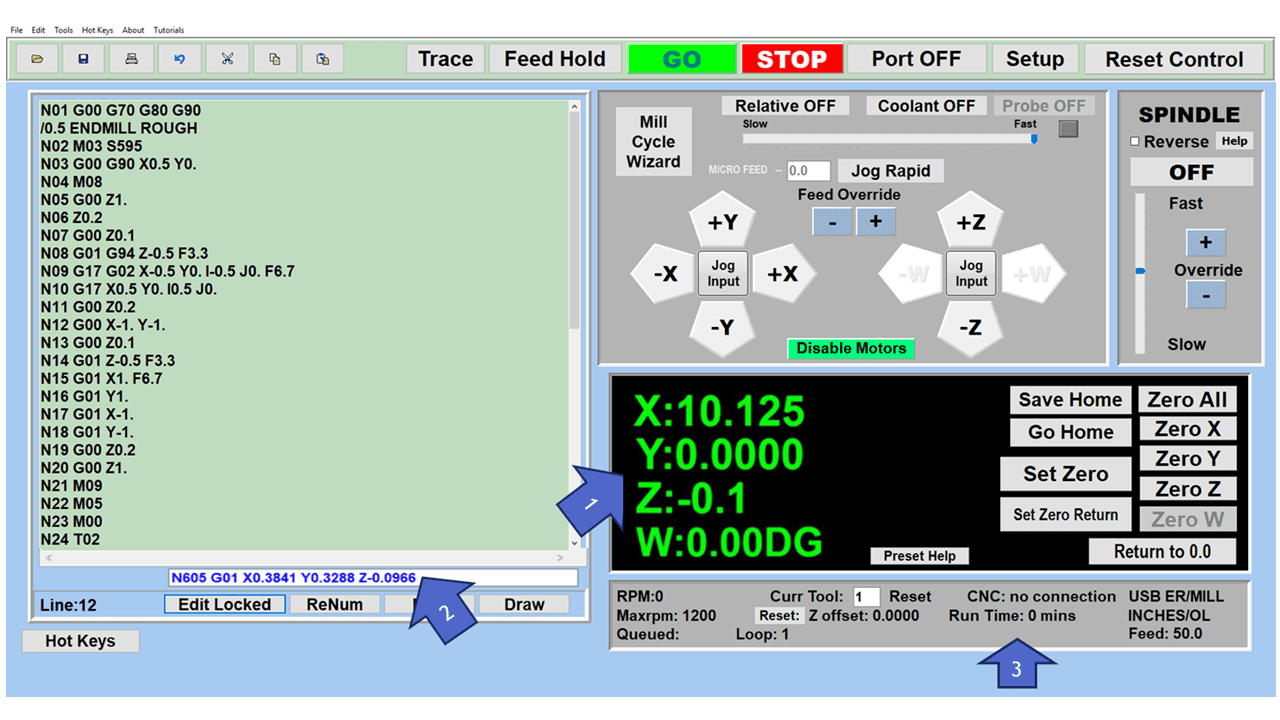
In a situation where you cannot begin your cutter at itā€™s 0.00 location, you can ā€œPre-Setā€ directly into the counters by typing in your beginning coordinate. You can press Go from here to run your program. You can also ā€œzero allā€ or ā€œzeroā€ your counters independently. With one click of the [Return to 0.0] button, all axes will travel back to its respective 0.0 on the machine.

Slide 1

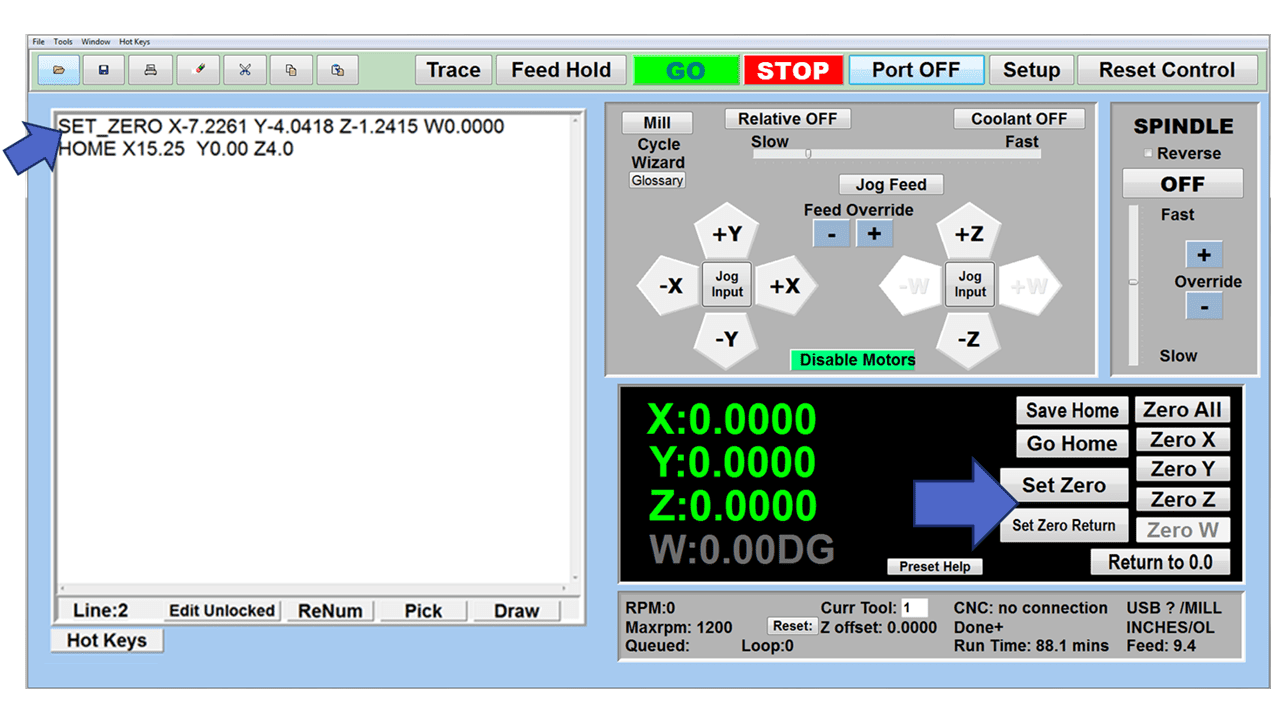
17. Set and Save your 0.00 position for future runs
Set and save your 0.00 position on the machine. These coordinates will be recorded as the first line of the program in the Editor Screen. Should you desire to return to this program at a later date, you only have to click on the Set Zero Return button. This will command the machine to automatically jog each axis to its saved ā€œsetā€ 0.00 position according to the recorded coordinates at the first line of the program.

Slide 1

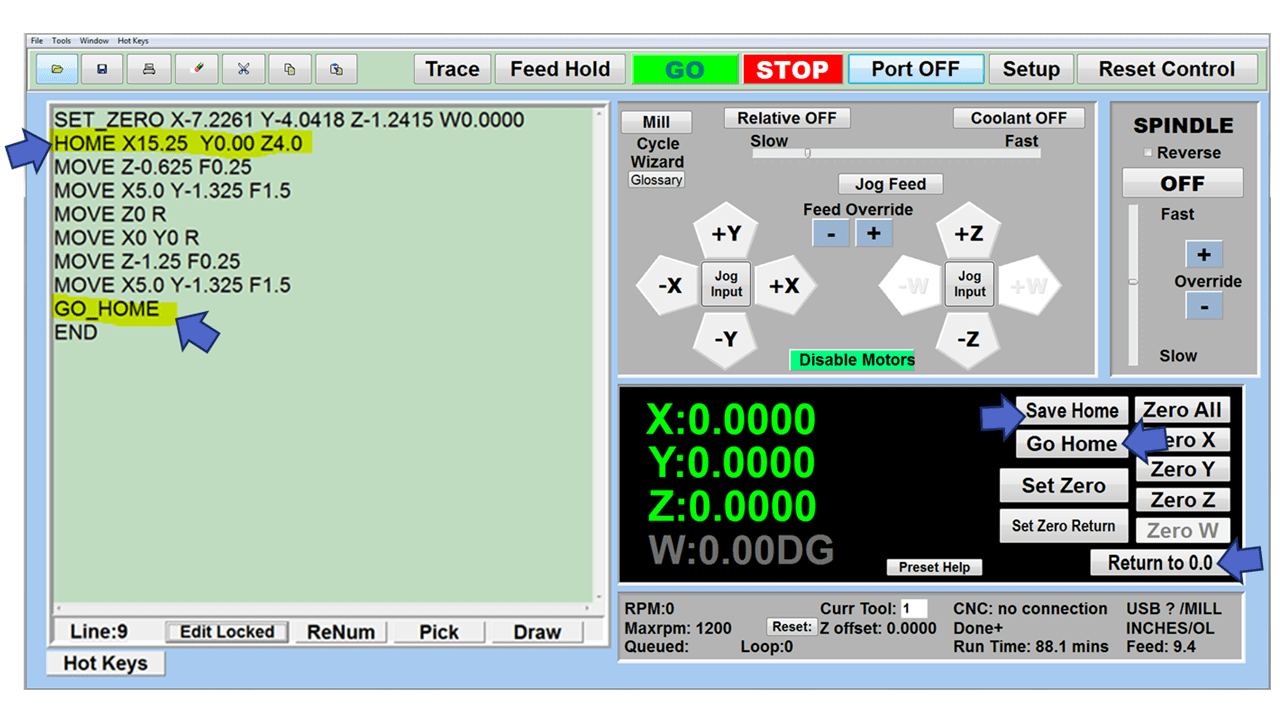
18. Create a ā€œHomeā€ position to clear your application and run multiple times
Letā€™s say you need to machine one application times 100 pieces. This usually requires a jig to retain that physical 0.00 position. But in this case, you want the program to end with a clearance of the axes to easily switch out the next piece of stock and start again. With Save Home, you have the ability to save this offset (home) position while still retaining your Set Zero position where the machine will mill your part out. Pressing [Save Home] will record this new position under the Set Zero line in your program.
Pressing [Go Home] will jog your axes back to your ā€œsaved homeā€ position where you originally pressed the Save Home command. You can also input GO_HOME from the Pick Menu as its own tool path in your program. At the completion of your program the axes will end at your Home position. Replace your part, then press [Return to 0.0] button to allow the axes to return to its zero position, and press Go to start your next run.

previous arrow
next arrow