CNC machines are utilized in every modern manufacturing segment, but it wasn’t always so. Manually operated machines previously ruled the manufacturing process. Because these machines typically required one operator, often a skilled machinist, for each milling machine, lathe, and grinder, machining processes were labor intensive.
Today, automation and efficiency are the cornerstones of the manufacturing industry. Modern machine tools have advanced control systems that help companies produce better, higher-quality parts than ever before.
In this guide, we will look at the various types of CNC machines, including lathe machines, routers, milling machines, grinders, and many more. We’ll uncover how they work, how manufacturers use them, and what to look for as a buyer, including how much these CNC machines cost.
What does CNC mean?
CNC is short for computer numerical control, a computerized manufacturing process that uses software to control the movements of various types of CNC machines. If you’ve ever asked what is a CNC machine, it’s simple: A CNC machine is simply a machine equipped with CNC technology and capabilities.
With the help of this technology, machinists and other skilled workers use mechanical design, drawings, mathematics, and computer programming skills to produce parts. CNC programmers and operators can take a metal workpiece and create a critical aerospace or automotive component with extreme accuracy. Many of today’s machines combine multiple tools into one, streamlining the CNC machining process.
What does a CNC machine do?
The primary function of CNC is to control the motions of a machine tool. Digitized data, a computer, and a computer-aided manufacturing (CAM) program work together to control, automate, and monitor the movements of the CNC tools. Large industrial machines typically use an integrated computer as a dedicated onboard controller, while smaller hobbyist models use an external computer.
Each CNC controller works with several motors and drive components to execute and control the programmed motions. On more sophisticated machines, a feedback system continuously monitors and adjusts the cutter’s speed, feed rate, and position.
What is an example of a CNC machine tool?
The milling machine is probably the most popular example of a CNC machine tool. Still, many others exist, including lathes, electric discharge machines (EDM), grinders, laser cutters, plasma cutters, waterjet cutters, CNC routers, and 3D printers. Although the CNC machining process for each of these varies to some degree, the essential principles of the machining process are the same across all of them.
CNC machines also come in a variety of sizes, from small desktop CNC machines like tabletop mills or benchtop routers to heavy-duty, large horizontal machining centers.
Let’s examine these machines individually to learn about the unique features of each one.
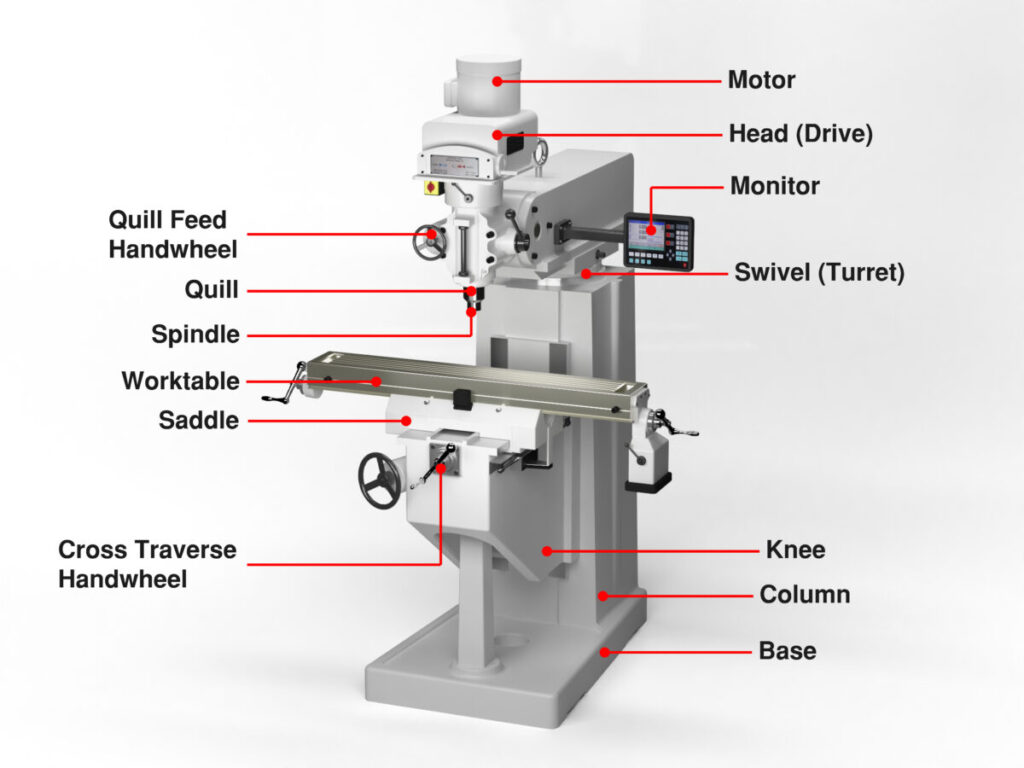
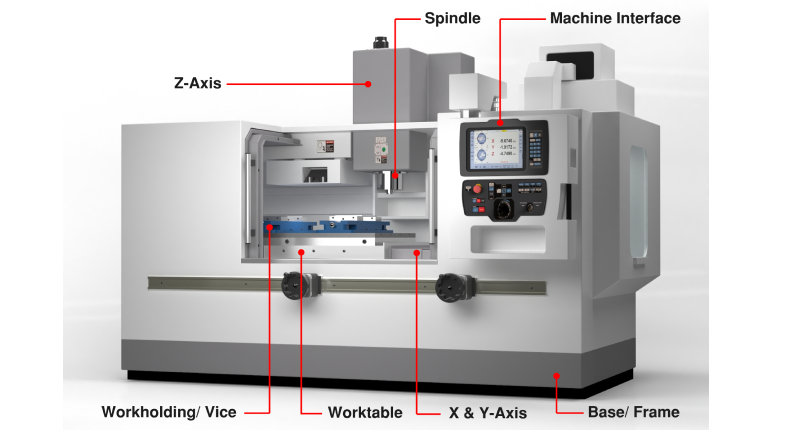
CNC Milling Machines
How does a CNC milling machine work?
The CNC milling process begins with designing a part on computer-aided design (CAD) software and then converting it into a format the CNC mill can read. Computer-aided manufacturing (CAM) software exports the design to a CNC machine program, typically in G-code format. The machine reads the coded instructions and puts them into operation. This process directs every move the machine makes to duplicate the CAD design in the appropriate material with precision. CNC machines offer a high-production output, reduced labor costs, and repeatability.
What are the uses of a CNC milling machine?
One of the critical benefits of CNC milling is its versatility. CNC mills cut materials like steel, iron, aluminum, composites, alloys, etc. to produce custom-designed parts more quickly than traditional machining methods. They can machine from a vertical or horizontal position, mill flat or on an angle, and create irregular surfaces or cavities.
CNC machines are ideal for mold work, where two or three axes of the milling table must be controlled simultaneously to produce cavities and surface contours. These machine tools are excellent for producing anything from cast iron foundry patterns and core boxes to the most complex stainless steel aerospace, military, and medical parts.
What should you consider when purchasing a CNC mill?
- Specifications: Match the CNC mill’s size to the type of work you’ll be doing
- Brand: Like other products, the top CNC milling machine brands have a reputation for excellence.
- Ease of programming: Each machine tool is different, so make sure you can create programs with the one you choose
- Size: Check the footprint of the machine to ensure it will fit in the available space
- Service: The manufacturer must provide affordable support when you need it
What are the prices of a CNC milling machine?
CNC Milling machines are available for a range of budgets, including:
- A desktop CNC milling machine for as low as $3,500.00
- A high-quality 9” x 49” Bridgeport-type CNC vertical mill for $12,500.00
- An entry-level 3-axis vertical machining center for between $60,000 and $100,000
- fA production 5-axis CNC mill for $500,000 and up.
For more information on the purchasing process, check out our milling machine buyer’s guide.
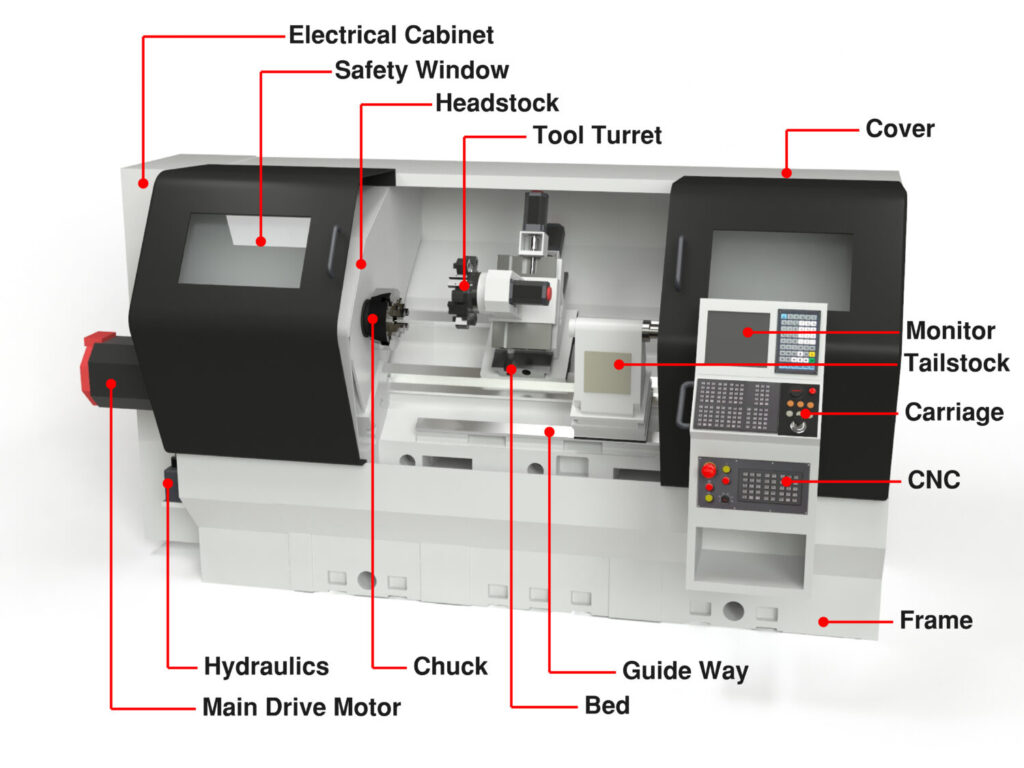
CNC Lathe Machine
How does a CNC lathe machine work?
Like the CNC mill, the CNC lathe requires a computer-aided design (CAD drawing) that can be converted into computer-aided manufacturing (CAM) format and exported to a CNC machine program with a tool path in G-code format.
With the CNC lathe, the workpiece is held between two centers, in a lathe chuck or a collet. The spindle turns, and the cutting tool moves into the material, creating round parts and drilled or bored holes. Unlike manual lathes, CNC lathes can handle complicated work of various sizes and usually require a skilled operator with thorough training.
What are some common uses of a CNC lathe machine?
CNC lathes feature a spinning spindle and a fixed tool for making cylindrical parts for many products in the metalworking and woodworking industries, making them almost as versatile as the CNC mill.
As a production machine tool, many CNC lathe machines can produce thousands of machined parts in one shift. Other smaller machines are designated for machining smaller quantities and would be appropriate for maintenance and jobbing shops.
CNC lathe machines can remove material quickly for parts that don’t require a smooth finish or slowly when detailed features require a fine finish. They are used in almost every industry, including the automotive, aerospace, firearms, and electronics industries.
Here are a few specific examples of parts made using CNC lathes:
- Camshafts
- Screws
- Crankshafts
- Baseball bats
- Table and chair legs
- Gun Barrels
- Musical instruments
What should you know before deciding on a CNC lathe?
- What kinds of parts and materials will you be producing?
- How many axes will you need for these parts?
- Is the CNC lathe compatible with your existing CAM software?
- Will the machine fit in your shop?
- Will the parts fit on your CNC lathe (both length and diameter)?
- Will the manufacturer provide affordable service and support when you need it?
What are the prices of CNC lathe machines?
CNC Milling machines are available for a range of prices, including:
- A small CNC lathe for around $5,000
- An entry-level two-axis CNC lathe for between $15,000 and $50,000
- A large production lathe for as much as $300,000.
For more information, be sure to read our CNC lathe machine buyer’s guide.
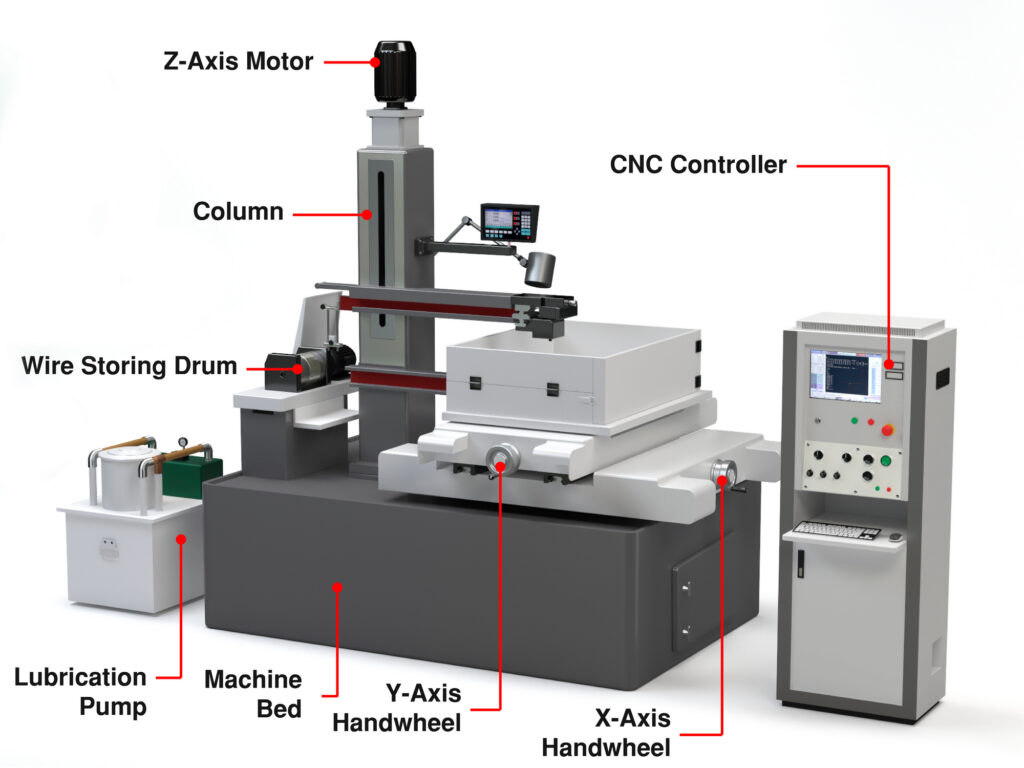
CNC Wire Electric Discharge Machine (EDM)
How does A wire EDM work?
Wire EDM is a manufacturing process that uses a thin brass or copper wire to cut hardened workpieces. The wire acts as the electrode, and the material is removed from the workpiece by frequent current discharges between two electrodes (the wire and the workpiece). The electrodes are separated by a dielectric fluid (typically deionized water) and subjected to electric voltage. The wire continuously unwinds from a spool.
What are some common uses of wire EDM?
Wire EDM is frequently used in the mold and die manufacturing processes, primarily for extrusion dies and blanking punches. EDM works well for both prototypes and total production runs and is most effective for manufacturing metal components and tools. The automotive, aerospace, and electronics industries often use EDM for their parts.
What should you consider when purchasing A wire EDM?
After the initial expense, the two most critical factors to consider are the ongoing expenses of consumables and maintenance. In other words, how quickly will this EDM get your parts off the machine using the least amount of wire, and how much downtime will you sustain from maintenance and repair? These factors are hard to quantify unless you have EDM experience, so your best bet is thorough research and talking to a few manufacturers with wire EDM knowledge.
How much do EDMs cost?
EDM machines’ prices vary widely depending on features:
- Entry-level wire EDM prices can begin below $7,000
- Top-of-the-line models loaded with features may start at $100,000
For more information on wire EDM machines, be sure to check out our wire EDM machine buyer’s guide

CNC Grinders
How does a CNC grinder work?
CNC grinding machines are machine tools that use a high-speed rotating grinding wheel to remove metal from a workpiece. A CNC grinder is programmed to improve surface finishes and remove material while maintaining the required tolerances.
Although there are several types of CNC grinders, the two most frequently used are the surface grinder and the cylindrical grinder. CNC surface grinders operate automatically from a program to create the finest finish on flat surfaces. In contrast, cylindrical grinders work on round workpieces to grind the outside diameter (OD) or inside diameter (ID) to precise specifications.
What are some common uses of grinders?
Grinding is used in many industries and for various applications, including:
- Anytime a precise surface finish is critical
- Grinding various tools and cutters
- Precise internal grinding on tapered, straight, and formed diameters
- Cylindrical grinding on outside diameters such as shafts, pistons, camshafts, etc.
- Slitting and parting operations
What should you consider when purchasing a grinder?
First, determine the type of grinder you need based on the kind of work you’ll be doing (flat or cylindrical). Next, consider the grinder’s specifications:
- Grinding wheel diameter and speed
- Machine horsepower
- Frequency and volt rating
- Input power required for various operations
- Material to be ground
- Coolant system
How much Do grinders cost?
CNC cylindrical grinder prices start below $20,000, while a large, heavy-duty brand could cost as much as $180,000. Most CNC surface grinders are in the $25,000 to $60,000 price range.
Read our CNC grinding machine buyer’s guide
CNC Laser Cutters
How does a CNC laser cutter work?
CNC laser cutting is a non-contact, thermal-based machining operation that focuses a high-intensity laser beam on a metal workpiece, melting and cutting it to create the desired shape. The process involves a CNC laser cutter that has a laser head containing a focusing lens and a nozzle. Compressed gas flows through the nozzle that emits the laser beam, cools the focusing lens, and removes the vaporized metal from the workpiece..
The temperature where the beam meets the workpiece is exceptionally high and causes the vaporization of the metal. CNC programming and technology control the movements of the laser head and beam on the work surface to form custom shapes and designs.
What are some common uses Of laser cutters?
Laser cutting machines are valuable for engineering purposes, where the precision cutting of components for machines is critical. Laser cutters also cut structural and piping materials and flat sheet metal. CNC technology makes it easy to change settings and etch or engrave various designs on metal, wood, and plastic. The size and capacity of the laser cutter determines the type of work it can handle.
What should you consider when purchasing a laser cutter?
There are three main types of laser cutters:
- CO2 Laser Cutters: These are popular and highly regarded because they are efficient and less expensive. They work best for cutting glass, plastics, leather, wood, and acrylic.
- Crystal Laser Cutters: With their smaller wavelengths and higher intensity than CO2 lasers, crystal laser cutters can cut through thicker materials, such as metals, plastics, and ceramics.
- Fiber Laser Cutters: Also known as solid-state lasers, fiber laser cutters offer the advantage of cutting reflective and conductive metals,. They have three times the efficiency of CO2 cutters and no moving parts, so maintenance is less. They are suitable for metals and organic materials.
How much do CNC laser cutters cost?
Laser cutters range from $8,000 to over $250,000, with the lower-priced models handling small, low-volume projects. For many commercial applications, a metal laser cutter will probably exceed $20,000.
CNC Plasma Cutters
How does a plasma cutter work?
CNC plasma cutters are computer-run machines that move a high-definition plasma torch using the numerical coding (G-code) programmed into the computer. The plasma cutter operates by forcing a gas or compressed air through a nozzle at high speeds and then introducing an electric arc to the gas, creating a plasma that can cut through metal.
Some of the gases used in plasma cutting include:
- Oxygen: Used for cutting mild steel up to 1-1/4 inches thick
- Argon and hydrogen mix: Provides high-quality, smooth cuts in stainless steel and aluminum
- Compressed air: Best for low-current cutting applications in metals up to 1-inch thick
- Nitrogen and methane: Work for thin stainless steel
What are some common uses of plasma cutters?
You will find plasma cutters in fabrication shops, automotive repair and restoration, construction, and salvage operations. Artists and designers use it to create signage, sculptures, and decorative panels for various interior projects.
Ideally, plasma can be used for cutting steel, brass, copper, and other conductive metals, although it’s less effective on stainless steel and aluminum. Plasma cutters work best when cutting more significant parts with loose tolerances and are perfect for general plate cutting since they cut quickly and are cheaper than other cutting methods.
What should you consider when purchasing a plasma cutter?
Plasma cutters work on practically any type of metal, so the primary consideration in choosing one is metal thickness and how much you plan to cut. Answer the following questions as you match a plasma cutter to your type of work:
- Are you cutting thick metal?
- How often will you use the plasma cutter?
- Will you adapt your power outlets for your new cutter?
- Do you now have a generator you plan to use with your plasma cutter?
- Will your electrical current fluctuate?
- Do you need a portable unit?
How much do CNC plasma cutters cost?
Depending on size and features, a CNC plasma cutter can run between $12,000 and $300,000. Because plasma technology has become cheaper to produce, the price has dropped significantly over the last five years.
To find out more, read our CNC plasma cutter buyer’s guide.
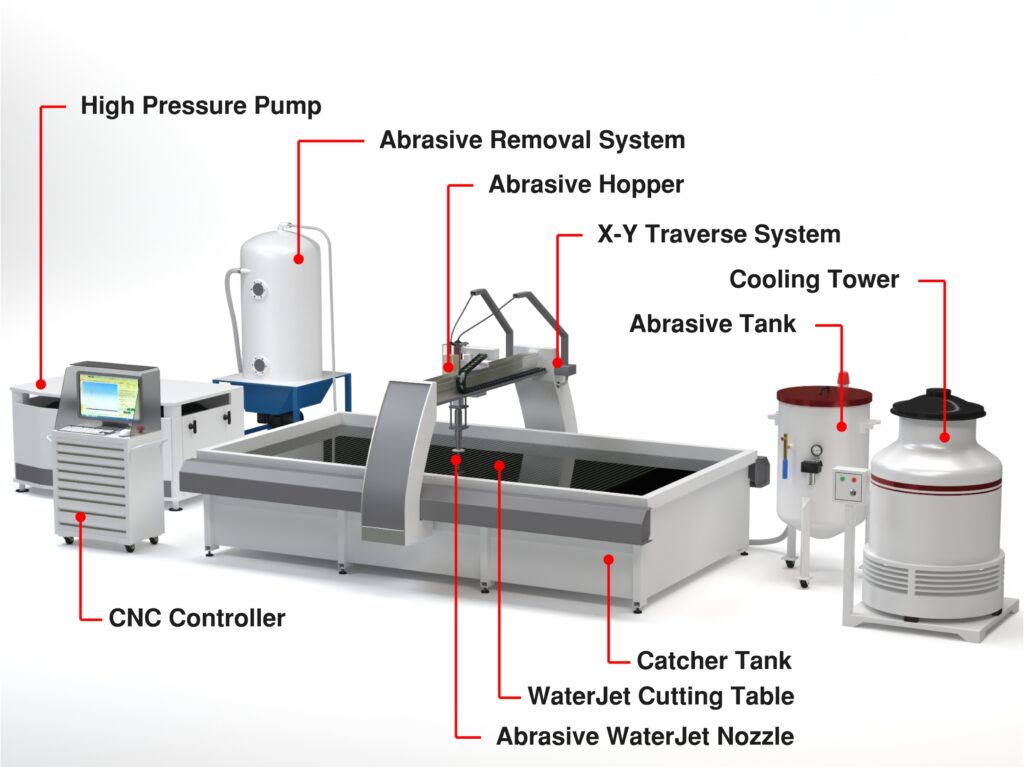
CNC Waterjets
How does a waterjet work?
Waterjet cutters are machine tools that use a high-pressure stream of water to erode a very thin line on a workpiece. Occasionally, a granular abrasive is added to the waterjet to enhance its cutting power. The abrasive is added at the nozzle, making it easy to switch between water-only and abrasive cutting.
Waterjet cutters work by forcing pressurized water through a ruby or diamond nozzle into a mixing chamber, creating a vacuum and drawing garnet sand into the stream where it is fired at the material. Since the jet stream moves at up to 2.5 times the speed of sound, cutting can be done at high feed rates, making it an efficient and powerful precision cutting tool.
What are some common uses of waterjets?
Waterjets are used in numerous glass projects, including kitchen splashbacks, stained glass, shower screens, and floor inlays. Other applications include:
- Metals such as steel, aluminum, titanium, brass, and nickel
- Stone and marble, decorative wall and floor tiles, stepping stones, and countertops for kitchens and vanities
- Soft materials like foam, interior automotive components, rubber, plastic, and cork
- Metal parts for the automotive industry, including bumpers, truck bed liners, fiberglass body parts, and trim
- Aerospace industry components like engine parts, cabin panels, and aluminum body parts
- The electronics industry uses waterjets to create circuit boards and many other parts
What should you consider when purchasing a waterjet?
- Size: Make sure you buy a waterjet that can handle your parts, the supplied sheets, and future growth. A 5’ X 10’ or a 6’ X 12’ machine usually works best.
- Ongoing Costs: The initial price and operating and maintenance costs of abrasive recycling systems almost always outweigh the cost of fresh abrasive.
- Pump Pressure: An Ultra High-Pressure Pump is not always necessary. A higher HP option with an excellent track record should work just as well, and save you money.
- Used Components: If you want an abrasive removal system, check the aftermarket before deciding on an expensive in-tank dedicated system.
How much do CNC waterjets cost?
A small waterjet cutting system starts at around $60,000, while complete custom systems can run into the hundreds of thousands.
To learn more about these machines, check out our CNC waterjet cutting machine buyer’s guide.
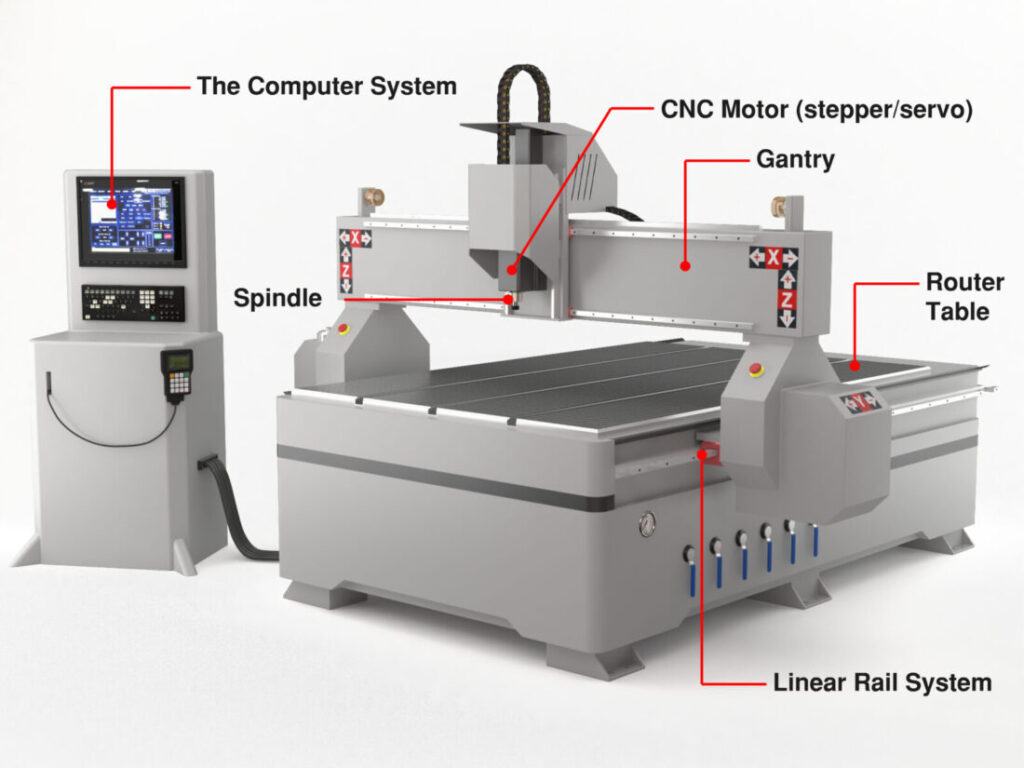
CNC Routers
How does a CNC router work?
Like the other CNC machine tools on the list, CNC routers operate with CAM software programs and G-code to control the machine’s movements, time, and direction. They have spindles that hold cutting tools to create shapes in various materials on a work table. The cutting tool can drill holes, mill cavities, engrave, and more.
Much like a milling machine, the CNC router’s drive system sends the spindle in three directions along the X, Y, and Z axes, allowing it to machine complex patterns and contours. Although there are similarities between the two machines, CNC routers are less robust than mills and are better suited to cutting softer materials like wood.
What are some common uses of routers?
Some of the most frequent applications for a CNC router include:
- Furniture making: CNC routers can produce various furniture items in large quantities
- Sign making: A CNC router is an excellent choice for creating signs because of its versatility
- Cabinet making: CNC routers lend themselves to the making of shelves, drawer fronts, side panels, and custom doors
- Arts and crafts: Picture frames, CNC Christmas projects, and plaques are a few examples of creations that are possible on the CNC router
- Molds and prototyping: CNC routers are ideal for machining epoxy, foam, and clay 3D design models, as well as cutting molds from EPS foam, polyurethane foam, EVA foam, and plastic.
What should you consider when purchasing a CNC router?
- Type of drive system: You must choose between rack and pinion, lead screw, and ball screw. Ball screw is the most expensive but allows for cutting larger workpieces with greater accuracy and efficiency.
- Servo vs stepper motors: Steppers have more magnetic poles than servo motors for enhanced accuracy. Servo motors supply twice their rated torque for periods and typically have greater efficiency.
- Machine weight: As a rule, heavier machines are more robust, meaning less vibration and more accurate cutting.
- Software: Don’t skimp on software. Your CNC router only does what the software tells it to do.
How much do CNC routers cost?
The basic three-axis models range from $5,000 to $10,000, while mid-range machines for large panels and signage will cost anywhere from $25,000 to $50,000. High-end machines typically run from $50,000 to $150,000.
For more detail, check out our CNC router machine buyer’s guide
3D Printers
The previous eight machines use a subtractive manufacturing process. In other words, these machine tools remove material by various methods. On the other hand, 3D printers represent an additive manufacturing process during which three-dimensional solid objects are created from a digital file.
In this additive process, each part is created by laying down successive layers of material, with each layer being a thinly sliced cross-section of the object. 3D printing is the opposite of subtractive manufacturing and is a unique and relatively new process that continues to evolve. As such, it deserves an in-depth and detailed examination.
For now, we will merely mention this exciting technology in passing.
Two examples of top-shelf CNC machines
Although modern computers are at the heart of every CNC machine, old-fashioned quality engineering separates the great ones from the average. The CNC Masters Supra Vertical Knee Mill and their 1440 CNC Lathe Machine are two prime examples of excellence. Both CNC machines are built in the USA (Irwindale, California) and are backed by an expert support team.
CNC Supra Vertical Knee Mills
Available in two table sizes, the Supra is a Bridgeport-type CNC knee mill with lots of helpful features – at a price that puts it within reach of small shops and hobbyists. This versatile CNC milling machine is ideal for production work, product development, rapid prototyping, engraving, and teaching applications in community colleges, vocational schools, and science labs. The easy-to-learn controls and software mean employees will be creating simple and complex parts in short order.
1440 CNC Lathe Machine
Stop outsourcing your high-volume round work to the big shops and paying their exorbitant prices. The 1440 CNC Lathe can turn complex manual turning applications into easy-to-program language, and run those complicated parts accurately on production runs. And when you have only one piece to run, the 1440 CNC Lathe reverts to manual control quickly and efficiently, avoiding the need to write a CNC program for a short run.
Talk to the CNC Lathe and Milling Machine Experts
Contact the pros at CNC Masters for more information on these CNC machines. Whether a seasoned machinist or a hobbyist, you will receive top-notch service and an iron-clad warranty with our excellent machine tools!


